TA Helper Developer Guide
About TA-Helper
TAs often have difficulties in managing students to teams in their classes, especially if they are managing multiple classes and even modules at the same time. Due to the large number of students, TAs need to track of many nominal rolls for their classes. To effectively manage all students, a TA should have a single platform to keep track of all students, modules and classes taught. Furthermore, students may need to be grouped into various teams for assessment and group project purposes.
TA-Helper is a all-in-one desktop student contact management application for TAs to take control of the trivial student management work so that they can focus on what is most important, teaching and delivering quality content to students!
Setting up, getting started
Refer to the guide Setting up and getting started.
Design
Architecture
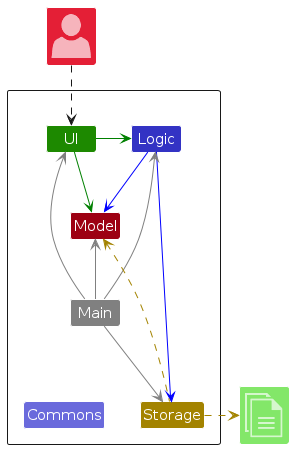
The Architecture Diagram given above explains the high-level design of the App.
Given below is a quick overview of main components and how they interact with each other.
Main components of the architecture
Main (consisting of classes Main and MainApp) is in charge of the app launch and shut down.
- At app launch, it initializes the other components in the correct sequence, and connects them up with each other.
- At shut down, it shuts down the other components and invokes cleanup methods where necessary.
The bulk of the app's work is done by the following four components:
UI: The UI of the App.Logic: The command executor.Model: Holds the data of the App in memory.Storage: Reads data from, and writes data to, the hard disk.
Commons represents a collection of classes used by multiple other components.
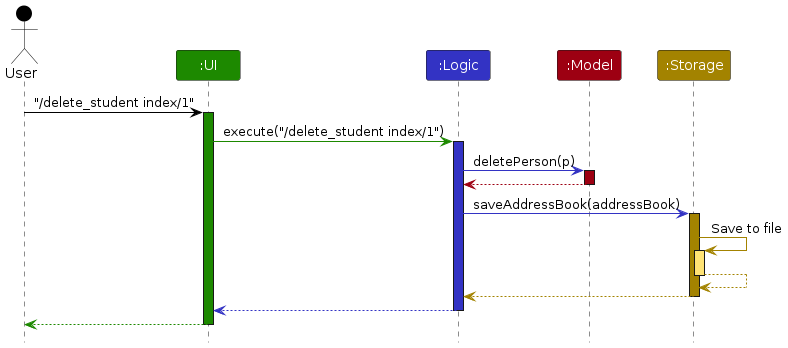
How the architecture components interact with each other
The Sequence Diagram below shows how the components interact with each other for the scenario where the user issues the command /delete_student index/1.
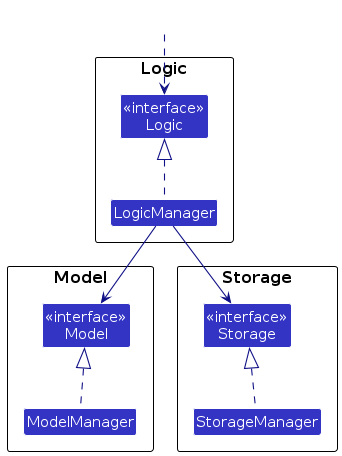
Each of the four main components (also shown in the diagram above),
- defines its API in an
interfacewith the same name as the Component. - implements its functionality using a concrete
{Component Name}Managerclass (which follows the corresponding APIinterfacementioned in the previous point.
For example, the Logic component defines its API in the Logic.java interface and implements its functionality using the LogicManager.java class which follows the Logic interface. Other components interact with a given component through its interface rather than the concrete class (reason: to prevent outside component's being coupled to the implementation of a component), as illustrated in the (partial) class diagram below.
The sections below give more details of each component.
UI component
The API of this component is specified in Ui.java
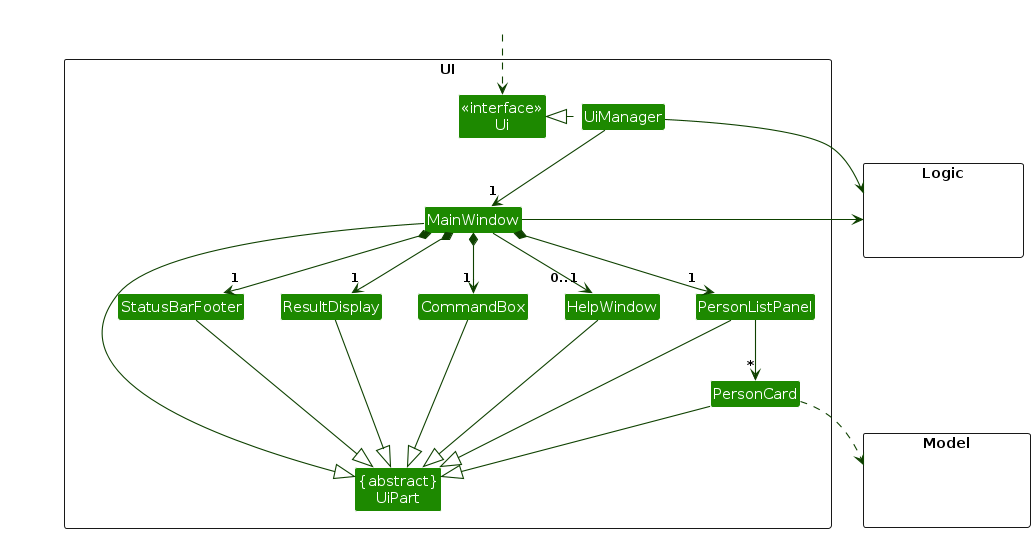
The UI consists of a MainWindow that is made up of parts e.g.CommandBox, ResultDisplay, PersonListPanel, StatusBarFooter etc. All these, including the MainWindow, inherit from the abstract UiPart class which captures the commonalities between classes that represent parts of the visible GUI.
The UI component uses the JavaFx UI framework. The layout of these UI parts are defined in matching .fxml files that are in the src/main/resources/view folder. For example, the layout of the MainWindow is specified in MainWindow.fxml
The UI component,
- executes user commands using the
Logiccomponent. - listens for changes to
Modeldata so that the UI can be updated with the modified data. - keeps a reference to the
Logiccomponent, because theUIrelies on theLogicto execute commands. - depends on some classes in the
Modelcomponent, as it displaysPersonobject residing in theModel.
Logic component
API : Logic.java
Here's a (partial) class diagram of the Logic component:

The sequence diagram below illustrates the interactions within the Logic component, taking execute("/delete_student index/1") API call as an example.
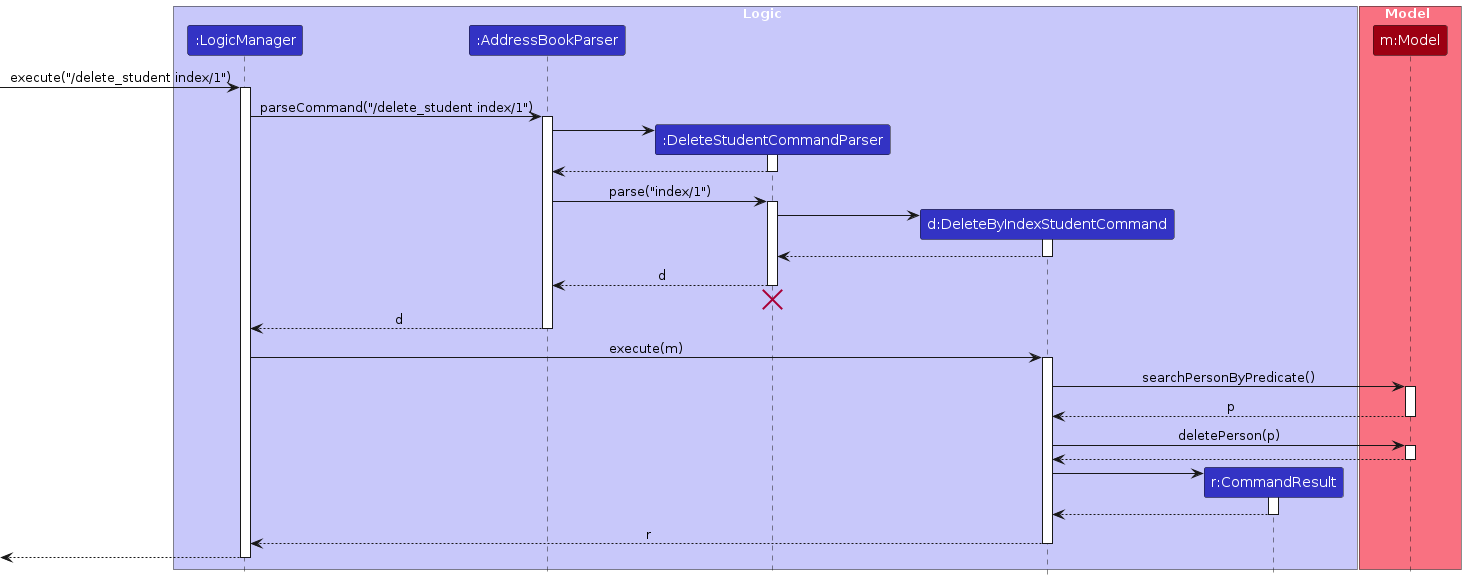
Note: The lifeline for DeleteCommandParser should end at the destroy marker (X) but due to a limitation of PlantUML, the lifeline continues till the end of diagram.
How the Logic component works:
- When
Logicis called upon to execute a command, it is passed to anAddressBookParserobject which in turn creates a parser that matches the command (e.g.,DeleteCommandParser) and uses it to parse the command. - This results in a
Commandobject (more precisely, an object of one of its subclasses e.g.,DeleteCommand) which is executed by theLogicManager. - The command can communicate with the
Modelwhen it is executed (e.g. to delete a person).
Note that although this is shown as a single step in the diagram above (for simplicity), in the code it can take several interactions (between the command object and theModel) to achieve. - The result of the command execution is encapsulated as a
CommandResultobject which is returned back fromLogic.
Here are the other classes in Logic (omitted from the class diagram above) that are used for parsing a user command:
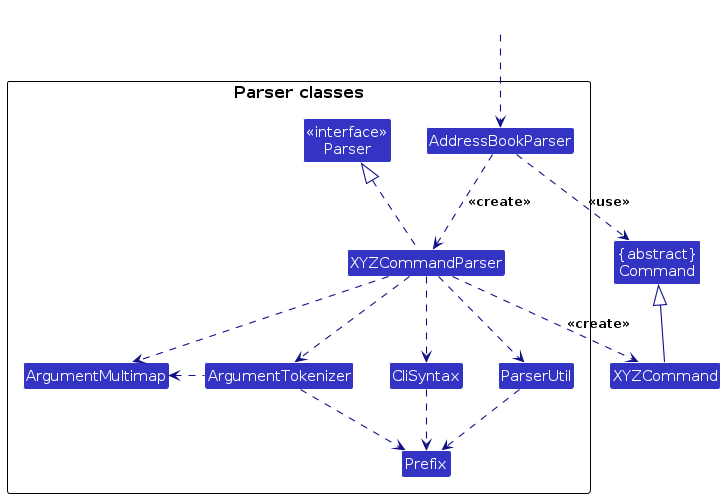
How the parsing works:
- When called upon to parse a user command, the
AddressBookParserclass creates anXYZCommandParser(XYZis a placeholder for the specific command name e.g.,AddStudentCommandParser) which uses the other classes shown above to parse the user command and create aXYZCommandobject (e.g.,AddStudentCommand) which theAddressBookParserreturns back as aCommandobject. - All
XYZCommandParserclasses (e.g.,AddStudentCommandParser,DeleteClassCommandParser, ...) inherit from theParserinterface so that they can be treated similarly where possible e.g, during testing.
Model component
API : Model.java
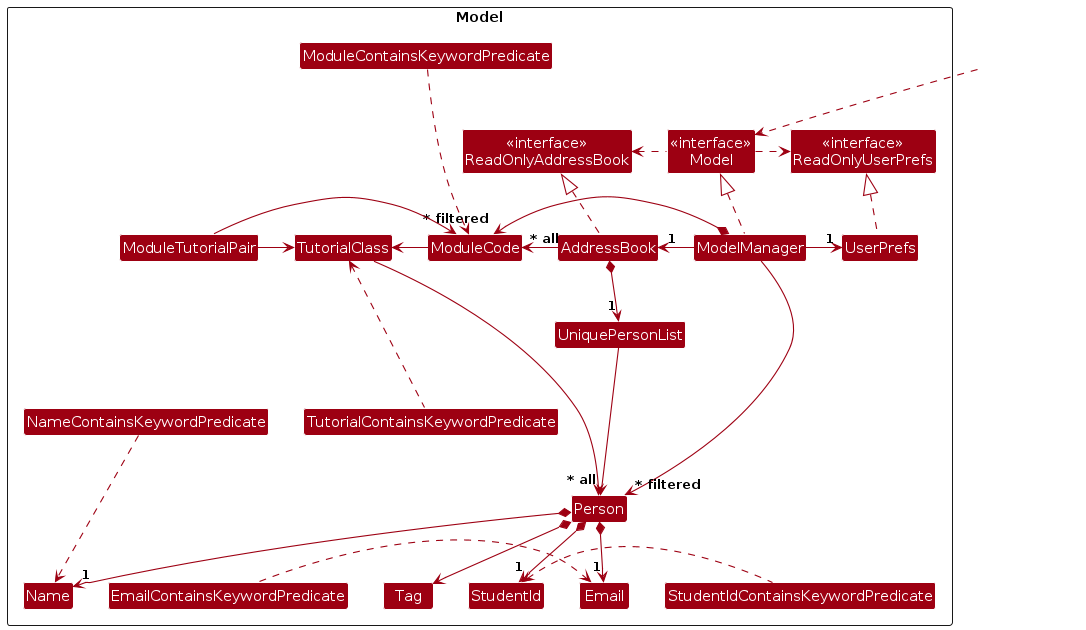
The Model component,
- stores the address book data i.e., all
Personobjects (which are contained in aUniquePersonListobject). - stores the currently 'selected'
Personobjects (e.g., results of a search query) as a separate filtered list which is exposed to outsiders as an unmodifiableObservableList<Person>that can be 'observed' e.g. the UI can be bound to this list so that the UI automatically updates when the data in the list change. - stores a
UserPrefobject that represents the user’s preferences. This is exposed to the outside as aReadOnlyUserPrefobjects. - does not depend on any of the other three components (as the
Modelrepresents data entities of the domain, they should make sense on their own without depending on other components)
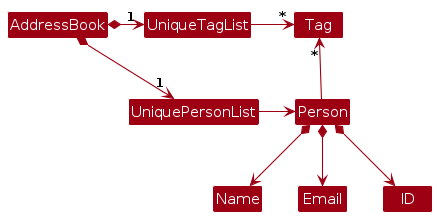
Note: An alternative (arguably, a more OOP) model is given below. It has a Tag list in the AddressBook, which Person references. This allows AddressBook to only require one Tag object per unique tag, instead of each Person needing their own Tag objects.
Storage component
API : Storage.java
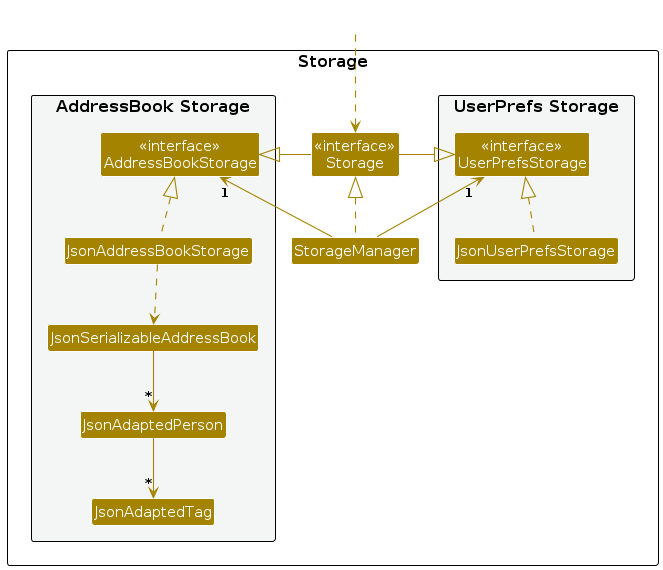
The Storage component,
- can save both address book data and user preference data in JSON format, and read them back into corresponding objects.
- inherits from both
AddressBookStorageandUserPrefStorage, which means it can be treated as either one (if only the functionality of only one is needed). - depends on some classes in the
Modelcomponent (because theStoragecomponent's job is to save/retrieve objects that belong to theModel)
Common classes
Classes used by multiple components are in the seedu.addressbook.commons package.
Implementation
This section describes some noteworthy details on how certain features are implemented.
[Implemented] Add student to TAHelper with unique ID or Email
The implemented add mechanism is facilitated by the abstract AddStudentCommand along with its specific commands AddStudentCommand, as well as the parser AddStudentCommandParser.
AddStudentCommandParser implements the Parser interface and its relevant operations.
AddStudentCommand extends the Command class and contains auxiliary operations that supports the mechanism.
Given below is an example usage scenario and how the add mechanism behaves at each step.
Example: /add_student name/john email/john@example.com id/A1234567L tags/

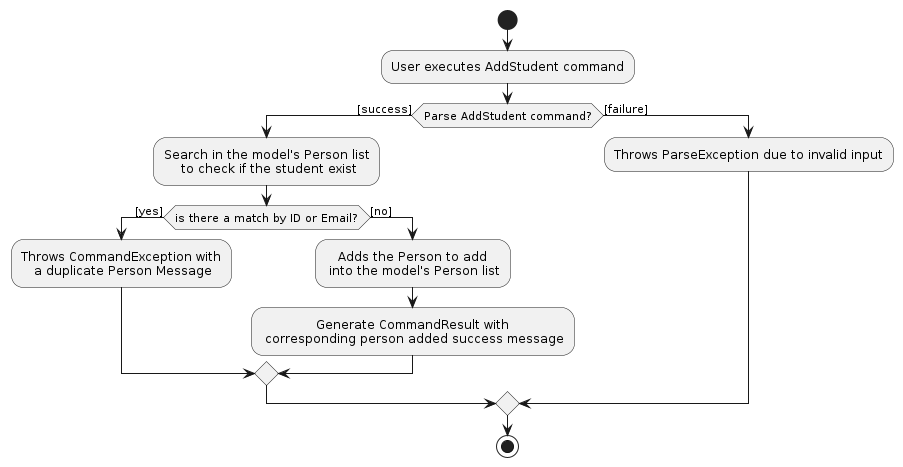
Execution steps:
Step 1. The user inputs and executes /add_student name/john email/john@example.com id/A1234567L tags/ command to add a student with name john, along with
a unique email john@example.com and unique id A1234567L
The execute command calls AddressBookParser#parseCommand(), which extracts the command word of the command and the arguments of the command.
Step 2. The AddressBookParser then creates a new AddStudentCommandParser and calls AddStudentCommandParser#parse(), with name/john, email/john@example.com, id/A1234567L as the arguments for the function.
Step 3. The AddStudentCommandParser parses the arguments and get the values of the user input associated with the prefixes, from there determine the name, email and id of the student to add.
Important Note: All fields must be specified. There must be a valid value for name, email and id. Additionally, email and id must be unique compared to the values already present in the system to get achieve a successful add. Tags here are optional and need not be specified.
Step 4. Based on the prefixes, AddStudentCommandParser creates an AddStudentCommand object. Each command contains all the required prefixes and values to used to create the command object.
Step 5. LogicManager calls AddStudentCommand#execute(), passing Model as an argument. This method retrieves the student to add to the TAHelper system.
Throughout the process, error handling (e.g checking for duplicate email or id, making sure references passed are not null) is utilised to mitigate potential errors and ensure valid execution.
Step 6. Finally, a CommandResult is created and the student is added to the TAHelper system.
Design considerations:
Aspect: Modularity and extensibility:
- Alternative 1 (current choice): A unique email and id is required when adding students into the TAHelper system, as well as user have to specify all fields, name, email and id in order to add a new student successfully.
- Pros: Ensures that all students can be identified in 2 ways, email and id. This helps facilitate other commands such as search and add student to classes as checking the email or id for those commands checks the whole system to find a match, rather than a subset of the system.
- Cons: An individual, at least in the context of NUS, can be uniquely identified by either their email E....@u.nus.edu, or by their Student ID. Therefore, specifying both may not be required and may cause extra work.
- Alternative 2: Allow user to specify more information about themselves such as year of study, course of study, just to name a few. This way we can support even more commands that searches say based on course of study, year of study etc.
- Pros: Search, add, delete, sort commands all can become more specific, and the commands can make use of more information to achieve its desired outcome as well, instead of solely relying on email or id, which although present in the system, may not be readily available or easily remembered by the users themselves.
- Cons: The addition of these fields to the system could lead to increase complexity of the codebase and increased coupling between components in the codebase. This will make the codebase harder to debug and maintain. Also, these field possibly being optional may lead to an increase in the number of null values and thus null checks in the system, which can make the codes in the codebase harder to reason about and refactor in the future.
[Implemented] Delete student
The implemented add mechanism is facilitated by the abstract DeleteStudentCommand along with its specific commands DeleteStudentByEmailCommand, DeleteStudentByIdCommand and DeleteStudentClassByIndexCommand, as well as the parser DeleteStudentCommandParser.
DeleteStudentCommandParser implements the Parser interface and its operations.
DeleteStudentCommand extends the Command class and contains auxiliary operations that supports the mechanism, such as retrieving the target tutorial class. Each of the following commands further extends DeleteStudentCommand based on its specific functionality:
DeleteStudentByEmailCommand— Delete student based on specified email.DeleteStudentByIdCommand— Delete student based on specified student id.DeleteStudentByIndexCommand— Delete student based on specified index (viewable from the UI).
Given below is an example usage scenario and how the add mechanism behaves at each step.
Format: /delete_student [id/ID] [email/EMAIL] [index/INDEX]
*Only 1 of the 3 parameters (id, email, index) must be specified
Example: /delete_student id/A0123456X
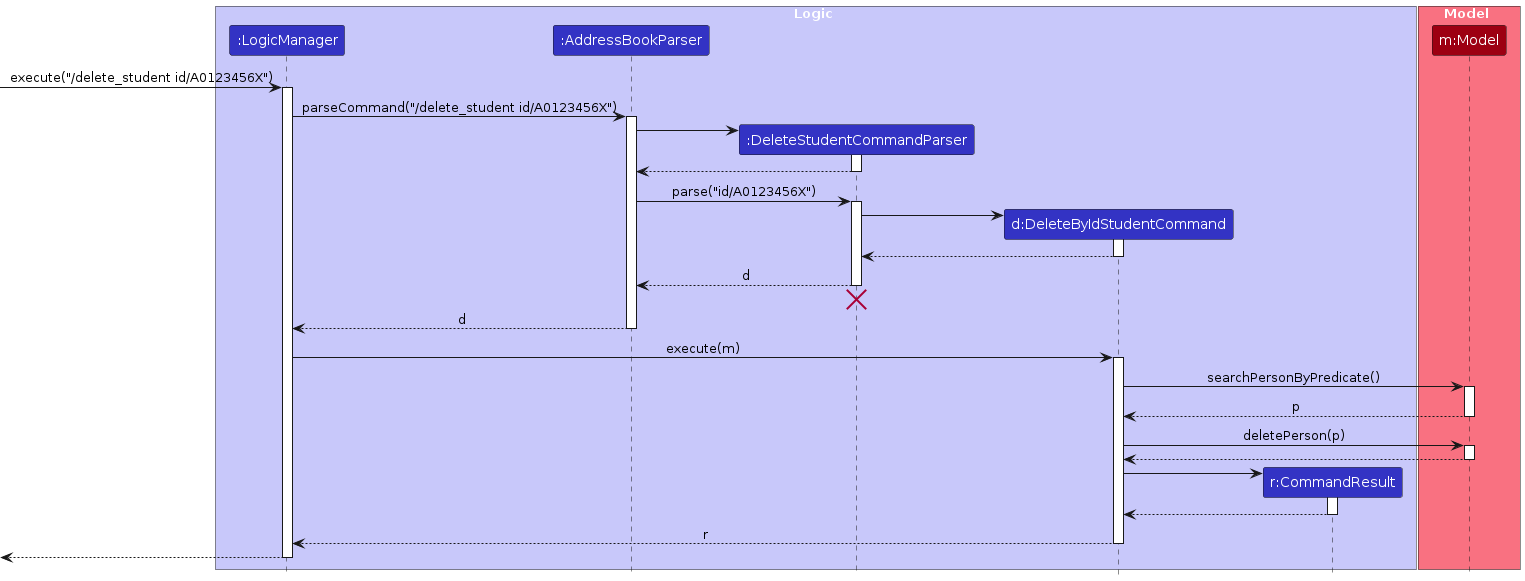
Step 1. The user executes /delete_student id/A0123456X command to delete the particular student with id A0123456X.
The execute command calls AddressBookParser#parseCommand(), which extracts the command word of the command and the arguments of the command.
Step 2. The AddressBookParser then creates a new DeleteStudentCommandParser and calls DeleteStudentCommandParser#parse(), with id/A0123456X as the argument.
Step 3. The DeleteStudentCommandParser parses the arguments to determine what parameter is used to specify the target student (email, index or id).
Important Note: The id/email/index must be specified. To determine the target student, only one prefix should used per command. If there are multiple prefixes, the target priority is as follows: By Index -> By Student ID -> By Email
Step 4. Based on the prefix used, DeleteStudentCommandParser creates the specific DeleteStudentCommand accordingly. Each command contains a specific predicate to find the student.
Step 5. LogicManager calls DeleteStudentCommand#execute(), passing Model as an argument. This method retrieves the student to delete using the defined predicate. Throughout the process, error handling (e.g checking for invalid student) is utilised to mitigate potential discrepancies and ensure valid execution.
Step 6. Finally, a CommandResult is created and the student is deleted.
Design considerations:
Aspect: Modularity and extensibility:
- Alternative 1 (current choice): Seperate each specific command into a different class, while overlapping code is abstracted to an abstract class.
- Pros: Specific commands are instantiated and thus can be easily traced and is more readable. Any reusable code is defined in the abstract class which can then be reused by the subclasses.
- Cons: May have duplicate code to a certain extent.
- Alternative 2: Lump into one generic command that handles each parameter accordingly.
- Pros: Reduces duplicate code and much cleaner (i.e only 1 command class is executed).
- Cons: The logic handling may be slightly more complex and messy within the class as all parameters have to be dealt with seperately (potentially using different logic).
[Implemented] Edit student
The implemented edit mechanism is facilitated by the EditCommand and EditCommandParser. EditCommand extends the
Command class and contains auxiliary operations that support the mechanism, such as creating the edited person to replace
the target. EditCommandParser implements the Parser interface and its operations.
Given below is an example usage scenario and how the mechanism behaves at each step.
Example: /edit_student index/1 id/A1234567L
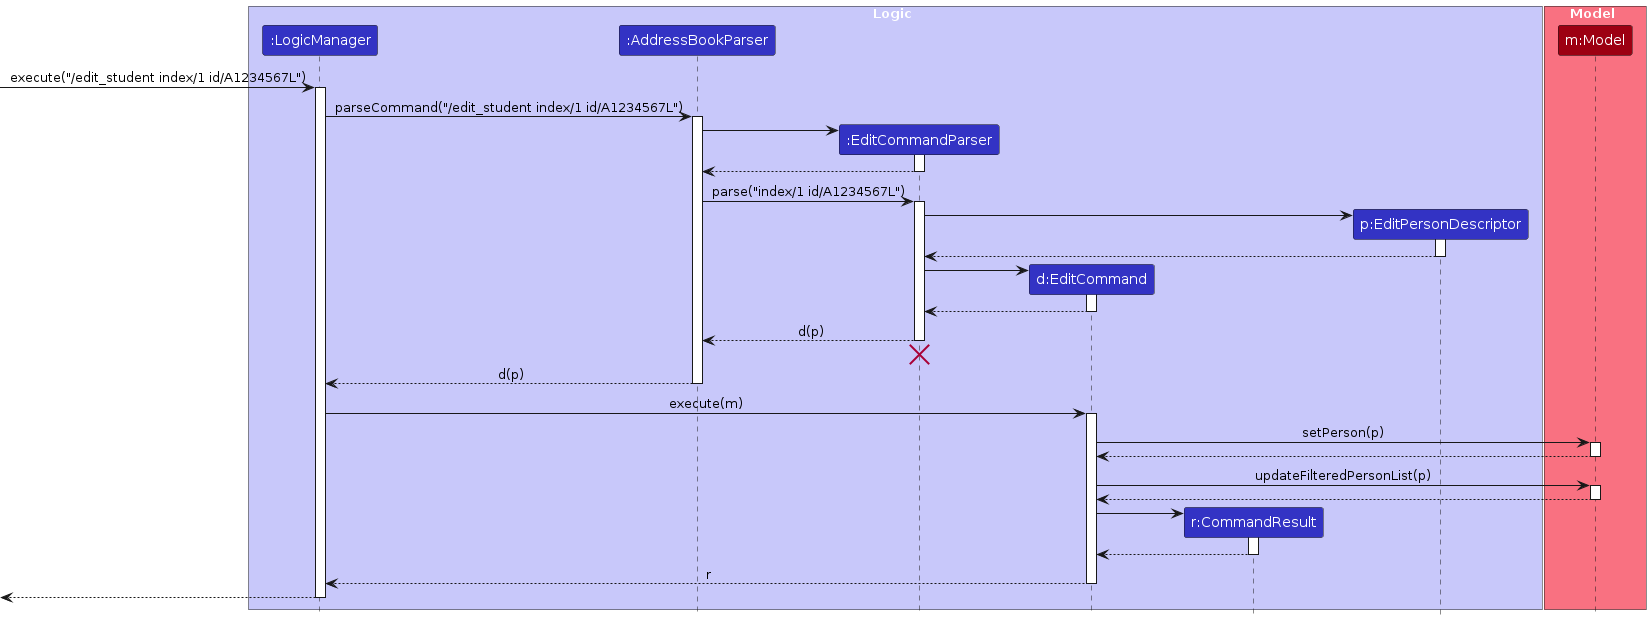
Step 1. The user executes /edit_student index/1 id/A1234567L command to edit the first student's id. The command calls
AddressBookParser#parseCommand(), which extracts the command word of the command and the arguments of the command.
Step 2. The AddressBookParser then creates a new EditCommandParser and calls EditCommandParser#parse(),
with index/1 id/A1234567L as the arguments.
Step 3. The EditCommandParser parses the arguments to determine which target student and parameter is being edited.
Important Note: At least one of the parameters must be present for the command to successfully return.
Step 4. EditCommandParser creates an EditPersonDescriptor, and sets the values to be edited. An EditCommand is created,
passing the EditPersonDescriptor as an argument.
Step 5. LogicManager calls EditCommand#execute(), passing Model as an argument. This method creates an editedPerson,
with all the edited information.
Important Note: Throughout the process, the method checks for duplicate persons in the Address Book. This refers to either same person, person with same email or person with same id.
Step 6. Finally, the method calls Model#setPerson, which replaces the target person with the edited person, and Model#updateFilteredPersonList()
to update the list with the new information. A CommandResult is created, informing of successful execution.
Important Note: Currently, edited student information only displays on the list it was edited in. The edited details are not propagated to other lists (students in different class/modules). More information can be found in the planned enhancements section.
Design considerations:
Aspect: Modularity and extensibility:
Alternative 1 (current choice): Lump into one generic command that handles each parameter accordingly.
- Pros: Reduces duplicate code and much cleaner (i.e only 1 command class is executed).
- Cons: The logic handling may be slightly more complex and messy within the class as all parameters have to be dealt with seperately (potentially using different logic). Since the scale of the command is relatively small, we have opted for this implementation to keep things simple.
Alternative 2: Separate each specific command into a different class, while overlapping code is abstracted to an abstract class.
- Pros: Specific commands are instantiated and thus can be easily traced and is more readable. Any reusable code is defined in the abstract class which can then be reused by the subclasses.
- Cons: May have duplicate code to a certain extent.
[Implemented] Add student to tutorial class
The implemented add mechanism is facilitated by the abstract AddStudentToClassCommand along with its specific commands AddStudentToClassByEmailCommand, AddStudentToClassByIdCommand and AddStudentToClassByIndexCommand, as well as the parser AddStudentToClassCommandParser.
AddStudentToClassCommandParser implements the Parser interface and its operations.
AddStudentToClassCommand extends the Command class and contains auxiliary operations that supports the mechanism, such as retrieving the target tutorial class. Each of the following commands further extends AddStudentToClassCommand based on its specific functionality:
AddStudentToClassByEmailCommand— Add student based on specified email to a tutorial class.AddStudentToClassByIdCommand— Add student based on specified student ID to a tutorial class.AddStudentToClassByIndexCommand— Add student based on specified index (viewable from the UI) to a tutorial class
Given below is an example usage scenario and how the add mechanism behaves at each step.
Format: /add_student_to_class [id/ID] [email/EMAIL] [index/INDEX] module/MODULE tutorial/TUTORIAL
*Only 1 of the 3 optional parameters (id, email, index) must be specified
Example: /add_student_to_class id/A0123456X module/CS2103T tutorial/T09
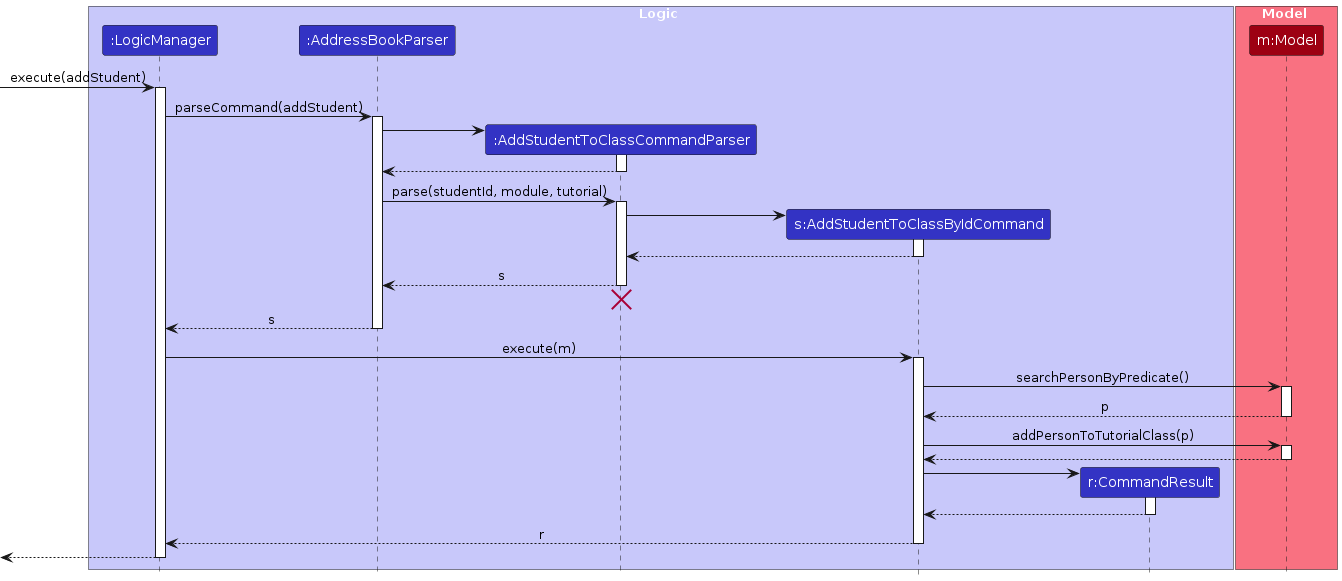
Step 1. The user executes /add_student_to_class id/A01234567X module/CS2103T tutorial/T09 command to add the particular student with id A01234567X to the module CS2103T and tutorial class T09.
The execute command calls AddressBookParser#parseCommand(), which extracts the command word of the command and the arguments of the command.
Step 2. The AddressBookParser then creates a new AddStudentToClassCommandParser and calls AddStudentToClassCommandParser#parse(), with id/A01234567X, module/CS2103T and tutorial/T09 as the arguments.
Step 3. The AddStudentToClassCommandParser parses the arguments to determine what parameter is used to specify the target student (email, index or id). Additionally, the ModuleCode and TutorialClass is determined.
Important Note: The tutorial class and module code must be specified. To determine the target student, only one prefix should used per command. If there are multiple prefixes, the target priority is as follows: By Index -> By Student ID -> By Email
Step 4. Based on the prefix used, AddStudentToClassCommandParser creates the specific AddStudentToClassCommand accordingly. Each command contains a specific predicate to find the student.
Step 5. LogicManager calls AddStudentToClassCommand#execute(), passing Model as an argument. This method retrieves the target module and tutorial class. Then, the method retrieves the student to add using the defined predicate. Throughout the process, error handling (e.g checking for invalid student/module/tutorial) is utilised to mitigate potential discrepancies and ensure valid execution.
Step 6. Finally, a CommandResult is created and the student is added to the tutorial class.
Design considerations:
Aspect: Modularity and extensibility:
- Alternative 1 (current choice): Seperate each specific command into a different class, while overlapping code is abstracted to an abstract class.
- Pros: Specific commands are instantiated and thus can be easily traced and is more readable. Any reusable code is defined in the abstract class which can then be reused by the subclasses.
- Cons: May have duplicate code to a certain extent.
- Alternative 2: Lump into one generic command that handles each parameter accordingly.
- Pros: Reduces duplicate code and much cleaner (i.e only 1 command class is executed).
- Cons: The logic handling may be slightly more complex and messy within the class as all parameters have to be dealt with seperately (potentially using different logic).
[Implemented] Delete student from class
The implemented add mechanism is facilitated by the abstract DeleteStudentFromClassCommand along with its specific commands DeleteStudentFromClassByEmailCommand, DeleteStudentFromClassByIdCommand and DeleteStudentFromClassByIndexCommand, as well as the parser DeleteStudentFromClassCommandParser.
DeleteStudentFromClassCommandParser implements the Parser interface and its operations.
DeleteStudentFromClassCommand extends the Command class and contains auxiliary operations that supports the mechanism, such as retrieving the target tutorial class. Each of the following commands further extends DeleteStudentCommand based on its specific functionality:
DeleteStudentFromClassByEmailCommand— Delete student based on specified email from a tutorial class.DeleteStudentFromClassByIdCommand— Delete student based on specified student id from a tutorial class.DeleteStudentByIndexCommand— Delete student based on specified index (viewable from the UI) from a tutorial class
Given below is an example usage scenario and how the add mechanism behaves at each step.
Example: /delete_student_from_class id/A01234567X module/CS2103T tutorial/T09
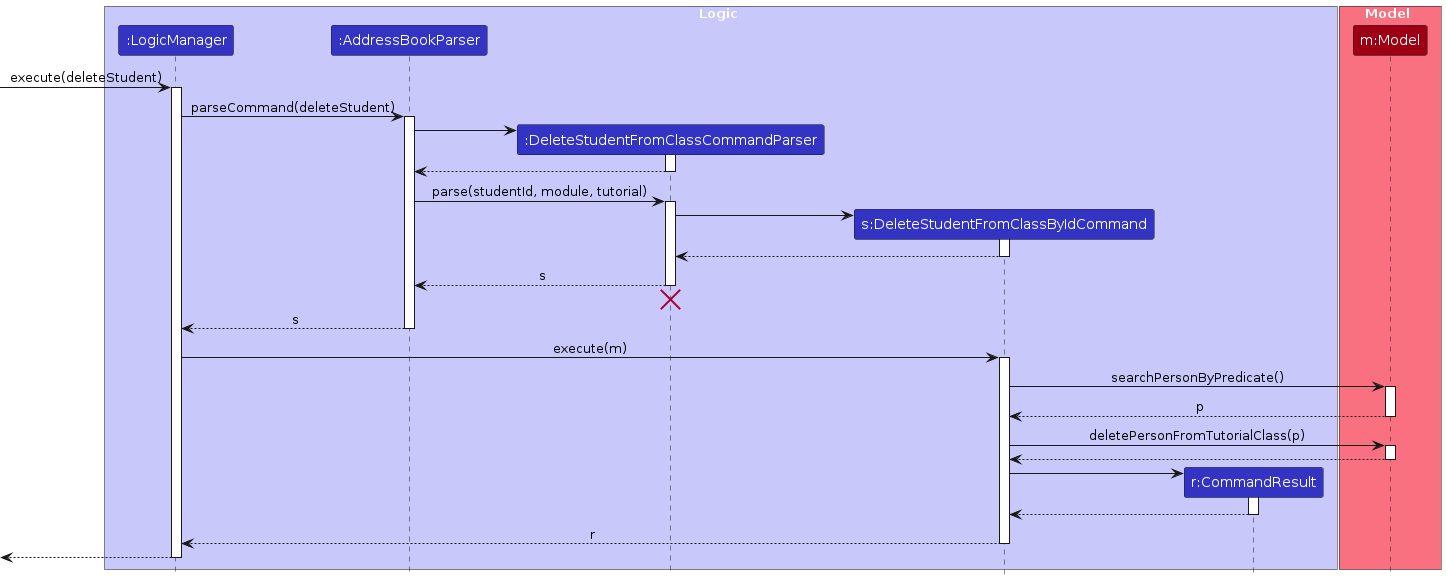
Step 1. The user executes /delete_student_from_class id/A01234567X module/CS2103T tutorial/T09 command to delete the particular student with id A01234567X from the module CS2103T and tutorial class T09.
The execute command calls AddressBookParser#parseCommand(), which extracts the command word of the command and the arguments of the command.
Step 2. The AddressBookParser then creates a new DeleteStudentFromClassCommandParser and calls DeleteStudentFromClassCommandParser#parse(), with id/A01234567X, module/CS2103T and tutorial/T09 as the arguments.
Step 3. The DeleteStudentFromClassCommandParser parses the arguments to determine what parameter is used to specify the target student (email, index or id). Additionally, the ModuleCode and TutorialClass is determined.
Important Note: The tutorial class and module code must be specified. To determine the target student, only one prefix should be used per command. If there are multiple prefixes, the target priority is as follows: By Index -> By Student ID -> By Email
Step 4. Based on the prefix used, DeleteStudentFromClassCommandParser creates the specific DeleteStudentFromClassCommand accordingly. Each command contains a specific predicate to find the student.
Step 5. LogicManager calls DeleteStudentFromClassCommand#execute(), passing Model as an argument. This method retrieves the target module and tutorial class. Then, the method retrieves the student to delete using the defined predicate. Throughout the process, error handling (e.g checking for invalid student/module/tutorial) is utilised to mitigate potential discrepancies and ensure valid execution.
Step 6. Finally, a CommandResult is created and the student is deleted from the tutorial class.
Design considerations:
Aspect: Modularity and extensibility:
- Alternative 1 (current choice): Seperate each specific command into a different class, while overlapping code is abstracted to an abstract class.
- Pros: Specific commands are instantiated and thus can be easily traced and is more readable. Any reusable code is defined in the abstract class which can then be reused by the subclasses.
- Cons: May have duplicate code to a certain extent.
- Alternative 2: Lump into one generic command that handles each parameter accordingly.
- Pros: Reduces duplicate code and much cleaner (i.e only 1 command class is executed).
- Cons: The logic handling may be slightly more complex and messy within the class as all parameters have to be dealt with seperately (potentially using different logic).
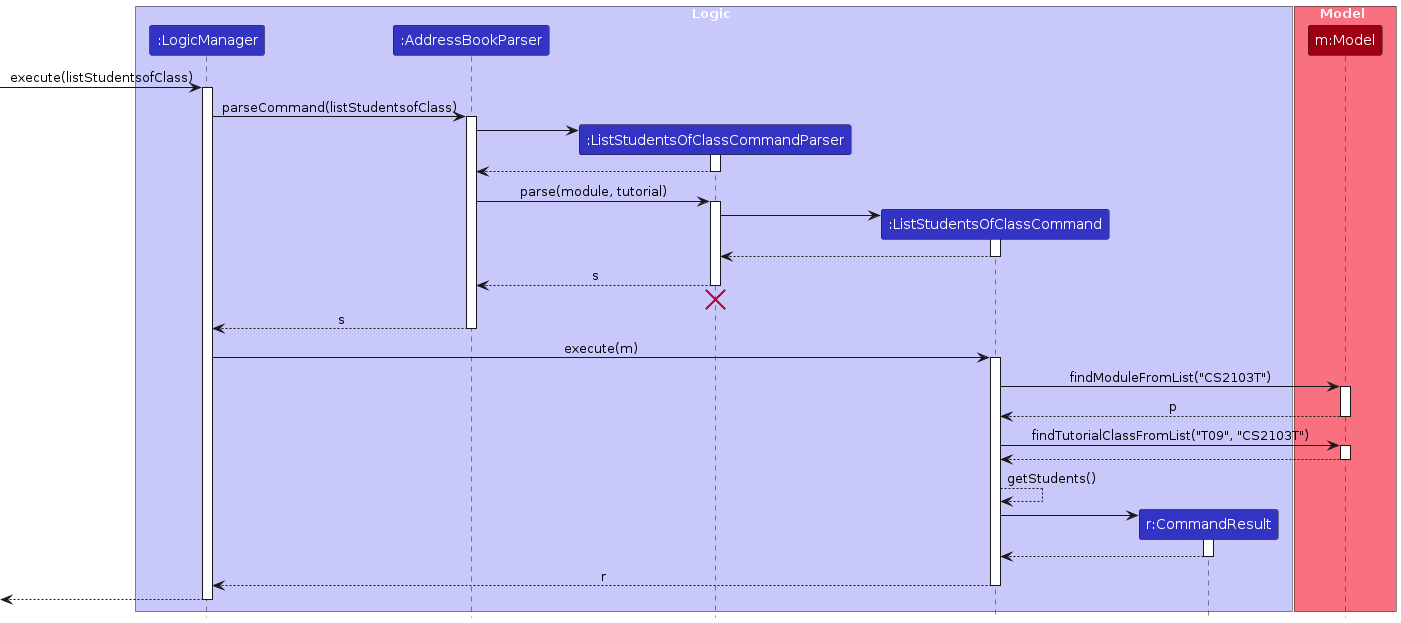
[Implemented] List students of class
The implementation of adding a class is facilitated by the ListStudentsOfClassCommand and ListStudentsOfClassCommandParser. ListStudentsOfClassCommandParser implements the Parser interface and it's operations. ListStudentsOfClassCommand extends the
Command class and contains auxiliary operations that supports the mechanism.
Given below is an example usage scenario and how the add mechanism behaves at each step.
Example: /class_list_students module/CS2103T tutorial/T09
Execution steps:
Step 1. The user inputs and executes /class_list_students module/CS2103T tutorial/T09 command to list students of the unique tutorial T09 of a module CS2103T.
The execute command calls AddressBookParser#parseCommand(), which extracts the command word of the command and the arguments of the command.
Step 2. The AddressBookParser then creates a new ListStudentsOfClassCommandParser and calls ListStudentsOfClassCommandParser#parse(), with module/CS2103T, tutorial/T09 as the arguments for the function.
Step 3. The ListStudentsOfClassCommandParser parses the arguments and get the values of the user input associated with the prefixes, from there determine the students to display to the user.
Important Note: All fields must be specified. There must be a valid value for module and tutorial. Additionally, module and tutorial must match with one of the values already present in the system to get achieve a successful listing. Tags here are optional and need not be specified.
Step 4. Based on the prefixes, ListStudentsOfClassCommandParser creates an ListStudentsOfClassCommand object. Each command contains all the required prefixes and values to used to create the command object.
Step 5. LogicManager calls ListStudentsOfClassCommand#execute(), passing Model as an argument. This method retrieves the module and tutorial class.
Throughout the process, error handling (e.g making sure references passed are not null) is utilised to mitigate potential errors and ensure valid execution.
Step 6. Finally, a CommandResult is created and the students of a particular tutorial class of a module is listed.
Design considerations:
Aspect: Modularity and extensibility:
- Alternative 1 (current choice): Lists all students with their tutorial classes and modules in the result display panel.
- Pros: Ensures that all students are displayed correctly.
- Cons: Users may want to view all the student of a certain module but are unable to do so.
[Implemented] Search for students
The implemented search mechanism is facilitated by SearchStudentCommand and SearchStudentCommandParser.
SearchStudentCommandParser implements the Parser interface and it's operations. SearchStudentCommand extends the
Command class with the ability to update Model's filtered person list using Predicate. It supports the following
Predicate:
NameContainsKeywordPredicate— Search students based on name.EmailContainsKeywordPredicate— Search students based on email.StudentIdContainsKeywordPredicate— Search students based on student id.
Given below is an example usage scenario and how the search mechanism behaves at each step.
Example: /search_student name/Bob
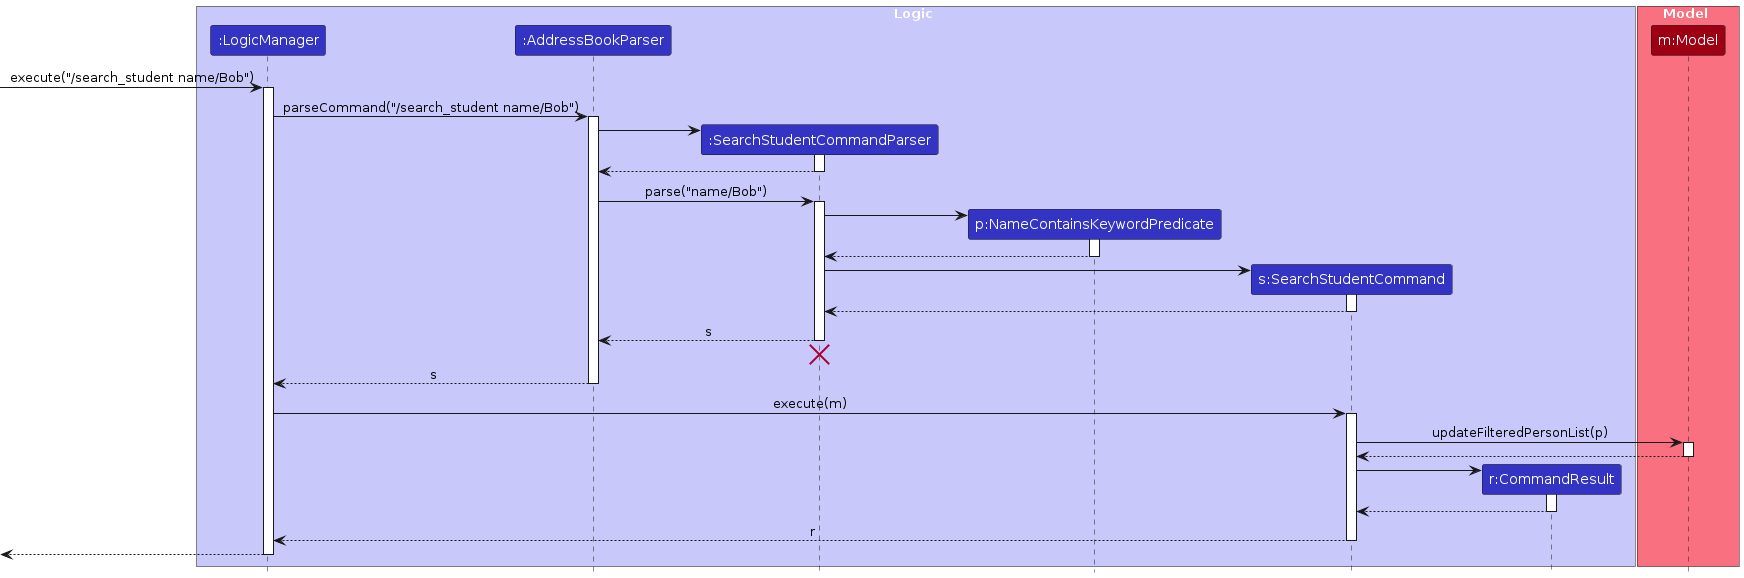
Step 1. The user executes /search_student name/Bob command to find students with the keyword Bob in their name.
The execute command calls AddressBookParser#parseCommand(), which extracts the command word of the command and the
arguments of the command.
Step 2. The AddressBookParser then creates a new SearchStudentCommandParser and calling
SearchStudentCommandParser#parse(), with name/Bob as the argument.
Step 3. The SearchStudentCommandParser parses the arguments to determine which prefix the user is searching in.
Note: Only one prefix can be used per command. If there are multiple prefixes, the method will throw an exception.
Step 4. SearchStudentCommandParser creates NameContainsKeywordPredicate and SearchStudentCommand, passing the predicate
as an argument into the command.
Step 5. LogicManager calls SearchStudentCommand#execute(), passing Model as an argument. This method calls
Model#updateFilteredPersonList() with the given predicate, updating the filtered list in Model with students whose
name contains Bob.
Step 6. Finally, a CommandResult is created and the new filtered is displayed to the user.
Design considerations:
Aspect: Modularity and extensibility:
- Alternative 1 (current choice): Only one prefix allowed per command.
- Pros: Easy to implement.
- Cons: Does not allow users to fine tune searches based on multiple fields.
- Alternative 2: Allow for multiple prefixes.
- Pros: Users can filter searches to a higher degree
- Cons: Handling combinations of different fields could be complex
[Implemented] Sort students
The implemented search mechanism is facilitated by SortStudentCommand and SortStudentCommandParser.
SortStudentCommandParser implements the Parser interface and it's operations. SortStudentCommand extends the
Command class with the ability to update Model's person list. SortStudentCommand supports the enumerations found
within SortStudentParameter.
Note: Unlike other commands that modify the current displayed person list using Predicate, SortStudentCommand
calls Model#getSortedPersonList(), which returns a copy of the UniquePersonList that can be sorted using
comparators.
The following are the current parameters that are supported with SortStudentCommand.
name— Sort students based on name.email— Sort students based on email.id— Sort students based on student id.
Given below is an example usage scenario and how the search mechanism behaves at each step.
Example: /sort_student by/id
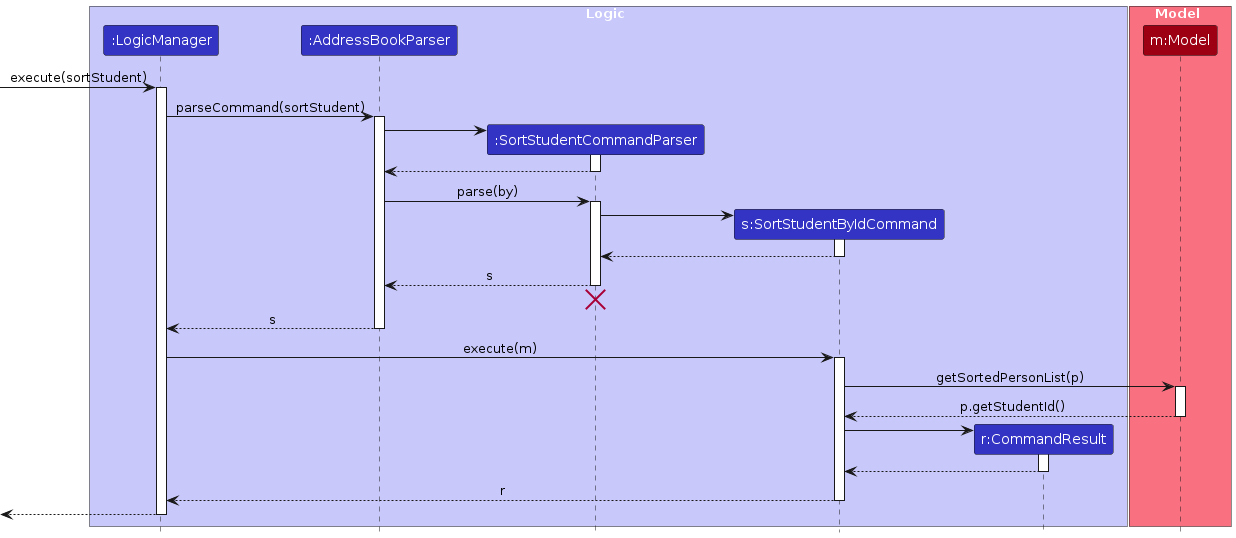
Step 1. The user executes /sort_student by/id command to sort student based on the value of their id.
The execute command calls AddressBookParser#parseCommand(), which extracts the command word of the command and the
arguments of the command.
Step 2. The AddressBookParser then creates a new SortStudentCommandParser and calling
SortStudentCommandParser#parse(), with by/id as the argument.
Step 3. The SortStudentCommandParser parses the arguments to determine which prefix the user is searching in.
Note: Only one input: name or email or id can be used per command. If there are multiple inputs, the method will throw an exception.
Step 4. id is parsed by SortStudentCommandParser, returning a SortStudentParameter. SortStudentCommandParser
creates SortStudentCommand and passes the new parameter as an argument.
Step 5. LogicManager calls SortStudentCommand#execute(), passing Model as an argument. A Comparator is created, passing a
function that compares by id as an argument. The execute method then calls AddressBook#getSortedPersonList() with the
given comparator, returning the sorted list in AddressBook with the sorted order of the students.
Step 6. Finally, a CommandResult is created and the sorted list of students is displayed to the user.
Design considerations:
Aspect: Modularity and extensibility:
- Alternative 1 (current choice): Only one prefix allowed per command.
- Pros: Easy to implement.
- Cons: Does not allow users to fine tune searches based on multiple fields.
- Alternative 2: Allow for multiple prefixes.
- Pros: Users can filter searches to a higher degree
- Cons: Handling combinations of different fields could be complex
[Implemented] Add class
The implementation of adding a class is facilitated by the AddClassCommand and AddClassCommandParser. AddClassCommandParser implements the Parser interface and it's operations. AddClassCommand extends the
Command class and contains auxiliary operations that supports the mechanism.
Given below is an example usage scenario and how the add mechanism behaves at each step.
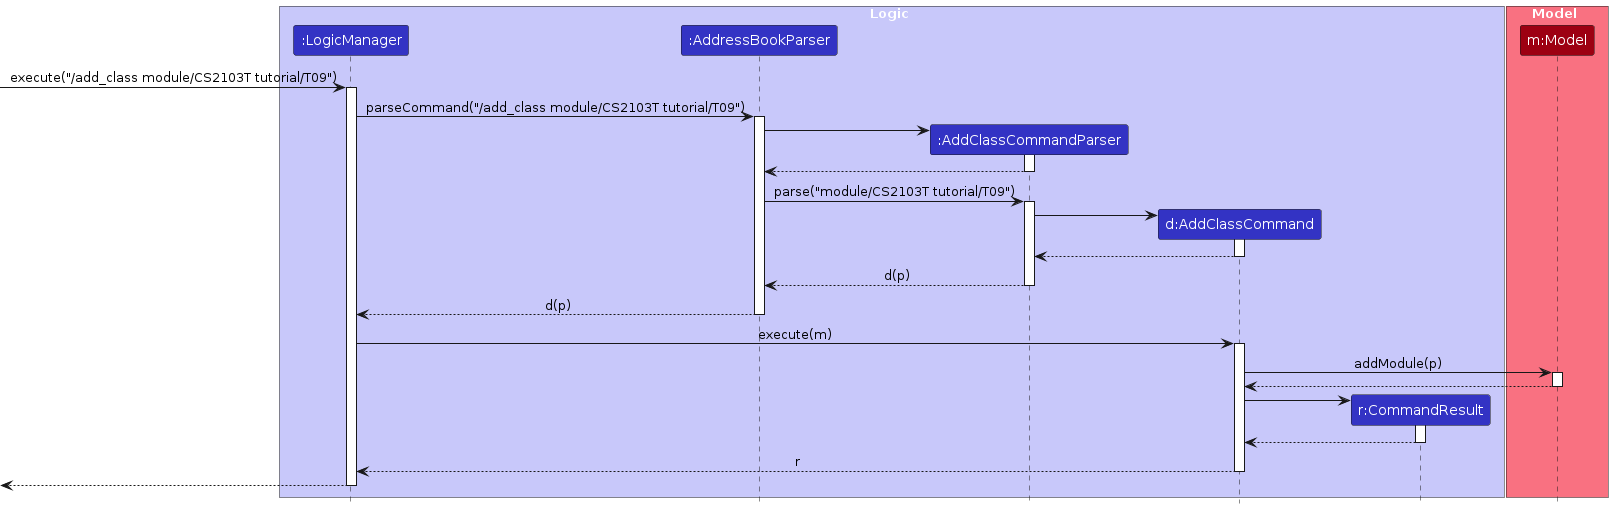
Example: /add_class module/CS2103T tutorial/T09
Execution steps:
Step 1. The user inputs and executes /add_class module/CS2103T tutorial/T09 command to add a module CS2103T, along with
a unique tutorial T09
The execute command calls AddressBookParser#parseCommand(), which extracts the command word of the command and the arguments of the command.
Step 2. The AddressBookParser then creates a new AddClassCommandParser and calls AddClassCommandParser#parse(), with module/CS2103T, tutorial/T09 as the arguments for the function.
Step 3. The AddClassCommandParser parses the arguments and get the values of the user input associated with the prefixes, from there determine the tutorial of the module to add.
Important Note: All fields must be specified. There must be a valid value for module and tutorial. Additionally, module and tutorial must be unique compared to the values already present in the system to get achieve a successful add. Tags here are optional and need not be specified.
Step 4. Based on the prefixes, AddClassCommandParser creates an AddClassCommand object. Each command contains all the required prefixes and values to used to create the command object.
Step 5. LogicManager calls AddClassCommand#execute(), passing Model as an argument. This method retrieves the class to add to the system.
Throughout the process, error handling (e.g checking for duplicate module code or tutorial, making sure references passed are not null) is utilised to mitigate potential errors and ensure valid execution.
Step 6. Finally, a CommandResult is created and the class is added to the TAHelper system.
Design considerations:
Aspect: Modularity and extensibility:
- Alternative 1 (current choice): A unique module code and tutorial class is required when adding classes into the TAHelper system, as well as user have to specify all fields, module code and tutorial class in order to add a new class successfully.
- Pros: Ensures that all classes are unique and not repeated. This helps facilitate other commands such as add student to classes to find a match in class easily without duplicates.
- Cons: Users may inadvertently provide incorrect or non-existent module codes or tutorial class identifiers, leading to errors in the system. This could result in frustration and a poor user experience.
- Alternative 2: Allow user to specify only the module code when adding classes
- Pros: Users can add classes without needing to specify the tutorial class immediately, allowing for greater flexibility in the workflow. They can add the class first and then specify the tutorial class later, as needed. The input process is also streamlined, reducing the burden on users. This simplicity can lead to faster data entry and a more intuitive user experience.
- Cons: Users may inadvertently create duplicate classes if they do not specify the tutorial class identifier accurately or if they forget to add it later. This could result in redundancy and inconsistencies within the system.
[Implemented] Delete class
The implementation of adding a class is facilitated by the DeleteClassCommand and DeleteClassCommandParser. DeleteClassCommandParser implements the Parser interface and it's operations. DeleteClassCommand extends the
Command class and contains auxiliary operations that supports the mechanism.
Given below is an example usage scenario and how the add mechanism behaves at each step.
Example: /delete_class module/CS2103T tutorial/T09

Execution steps:
Step 1. The user inputs and executes /delete_class module/CS2103T tutorial/T09 command to delete a module CS2103T, along with
a unique tutorial T09
The execute command calls AddressBookParser#parseCommand(), which extracts the command word of the command and the arguments of the command.
Step 2. The AddressBookParser then creates a new DeleteClassCommandParser and calls DeleteClassCommandParser#parse(), with module/CS2103T, tutorial/T09 as the arguments for the function.
Step 3. The DeleteClassCommandParser parses the arguments and get the values of the user input associated with the prefixes, from there determine the tutorial of the module to delete.
Important Note: All fields must be specified. There must be a valid value for module and tutorial. Additionally, module and tutorial must match with one of the values already present in the system to get achieve a successful delete. Tags here are optional and need not be specified.
Step 4. Based on the prefixes, DeleteClassCommandParser creates an DeleteClassCommand object. Each command contains all the required prefixes and values to used to create the command object.
Step 5. LogicManager calls DeleteClassCommand#execute(), passing Model as an argument. This method retrieves the class to delete from the system.
Throughout the process, error handling (e.g making sure references passed are not null) is utilised to mitigate potential errors and ensure valid execution.
Step 6. Finally, a CommandResult is created and the class is deleted from the module in the TAHelper system.
Design considerations:
Aspect: Modularity and extensibility:
- Alternative 1 (current choice): A unique module code and tutorial class is required when deleting classes from the TAHelper system, as well as user have to specify all fields, module code and tutorial class in order to delete a new class successfully.
- Pros: Ensures that the class is only deleted if there is a match in the system. Also ensure that the other tutorial classes of the module is not deleted if no tutorial class is specified.
- Cons: Users may inadvertently provide incorrect or non-existent module codes or tutorial class identifiers, leading to errors in the system. This could result in frustration and a poor user experience.
Alternative 2: Allow user the option to delete the entire module without specifying the tutorial class.
- Pros: Users can delete modules without needing to specify the tutorial class, allowing for greater ease in the workflow. This allows users who are no longer teaching the module to remove all the information with one command.
- Cons: Users may accidentally delete the entire module if they forgot to specify the tutorial class identifier and this may lead to great data damage. A separate command to delete module would be better.
Alternative 3: Allow user the option to delete all classes in the module without specifying the tutorial class.
- Pros: Users can delete modules without needing to specify the tutorial class, allowing for greater ease in the workflow. This allows users who are no longer teaching the module to remove all the information with one command.
- Cons: Users may accidentally delete all tutorial classes if they forgot to specify the tutorial class identifier and this may lead to great data damage. A separate command to delete all classes would be better.
[Implemented] Delete module
The implementation of adding a class is facilitated by the DeleteModuleCommand and DeletModuleCommandParser. DeleteModuleCommandParser implements the Parser interface and it's operations. DeleteModuleCommand extends the
Command class and contains auxiliary operations that supports the mechanism.
Given below is an example usage scenario and how the add mechanism behaves at each step.
Example: /delete_module module/CS2103T

Execution steps:
Step 1. The user inputs and executes /delete_module module/CS2103T command to delete a module CS2103T.
The execute command calls AddressBookParser#parseCommand(), which extracts the command word of the command and the arguments of the command.
Step 2. The AddressBookParser then creates a new DeleteModuleCommandParser and calls DeleteModuleCommandParser#parse(), with module/CS2103T as the argument for the function.
Step 3. The DeleteModuleCommandParser parses the arguments and get the values of the user input associated with the prefixes, from there determine the module to delete.
Important Note: All fields must be specified. There must be a valid value for module. Additionally, module must match with one of the values already present in the system to get achieve a successful delete. Tags here are optional and need not be specified.
Step 4. Based on the prefixes, DeleteModuleCommandParser creates an DeleteModuleCommand object. Each command contains all the required prefixes and values to used to create the command object.
Step 5. LogicManager calls DeleteModuleCommand#execute(), passing Model as an argument. This method retrieves the module to delete from the TAHelper system.
Throughout the process, error handling (e.g making sure references passed are not null) is utilised to mitigate potential errors and ensure valid execution.
Step 6. Finally, a CommandResult is created and the module is deleted from the TAHelper system.
Design considerations:
Aspect: Modularity and extensibility:
- Alternative 1 (current choice): A unique module code is required when deleting modules from the TAHelper system.
- Pros: Ensures that the class is only deleted if there is a match in the system.
- Cons: Users may accidentally use this command instead of
/delete_class. This will result in huge data loss.
[Implemented] List class
The implementation of adding a class is facilitated by the ListClassCommand and ListClassCommandParser. ListClassCommandParser implements the Parser interface and it's operations. ListClassCommand extends the
Command class.
Given below is an example usage scenario and how the add mechanism behaves at each step.
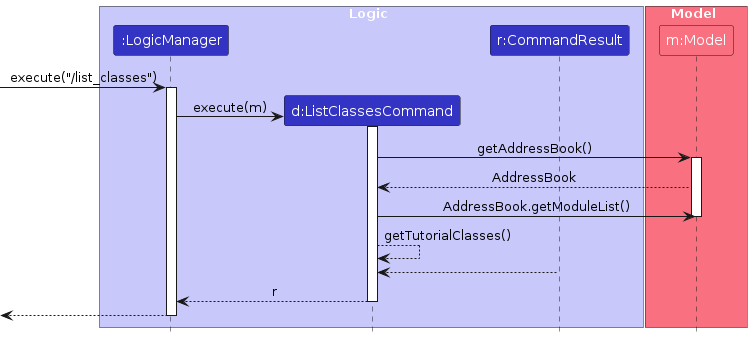
Example: /List_class
Execution steps:
Step 1. The user inputs and executes /list_class command to list all the class available.
The execute initiates the execution of the command by directly accessing the model. It begins by ensuring that the model contains data, specifically a list of modules. If the list is empty, it returns a message indicating there are no modules.
Step 2. It then iterates through each module, appending its string representation followed by a colon. Within each module iteration, it iterates through its tutorial classes, appending their string representations separated by commas.
Step 3. The result string is then trimmed and CommandResult.
Design considerations:
Aspect: Modularity and extensibility:
- Alternative 1 (current choice): Lists all modules and their tutorial classes in the result display panel.
- Pros: Ensures that all classes are displayed correctly.
- Cons: Users may want to view tutorial classes of certain modules only but are unable to do so.
[Implemented] Add team
The implementation of adding a class is facilitated by the AddTeamCommand and AddTeamCommandParser. AddTeamCommandParser implements the Parser interface and it's operations. AddTeamCommand extends the
Command class and contains auxiliary operations that supports the mechanism.
Given below is an example usage scenario and how the add mechanism behaves at each step.
Format: /add_team module/MODULE tutorial/TUTORIAL team/TEAM_NAME [size/SIZE]
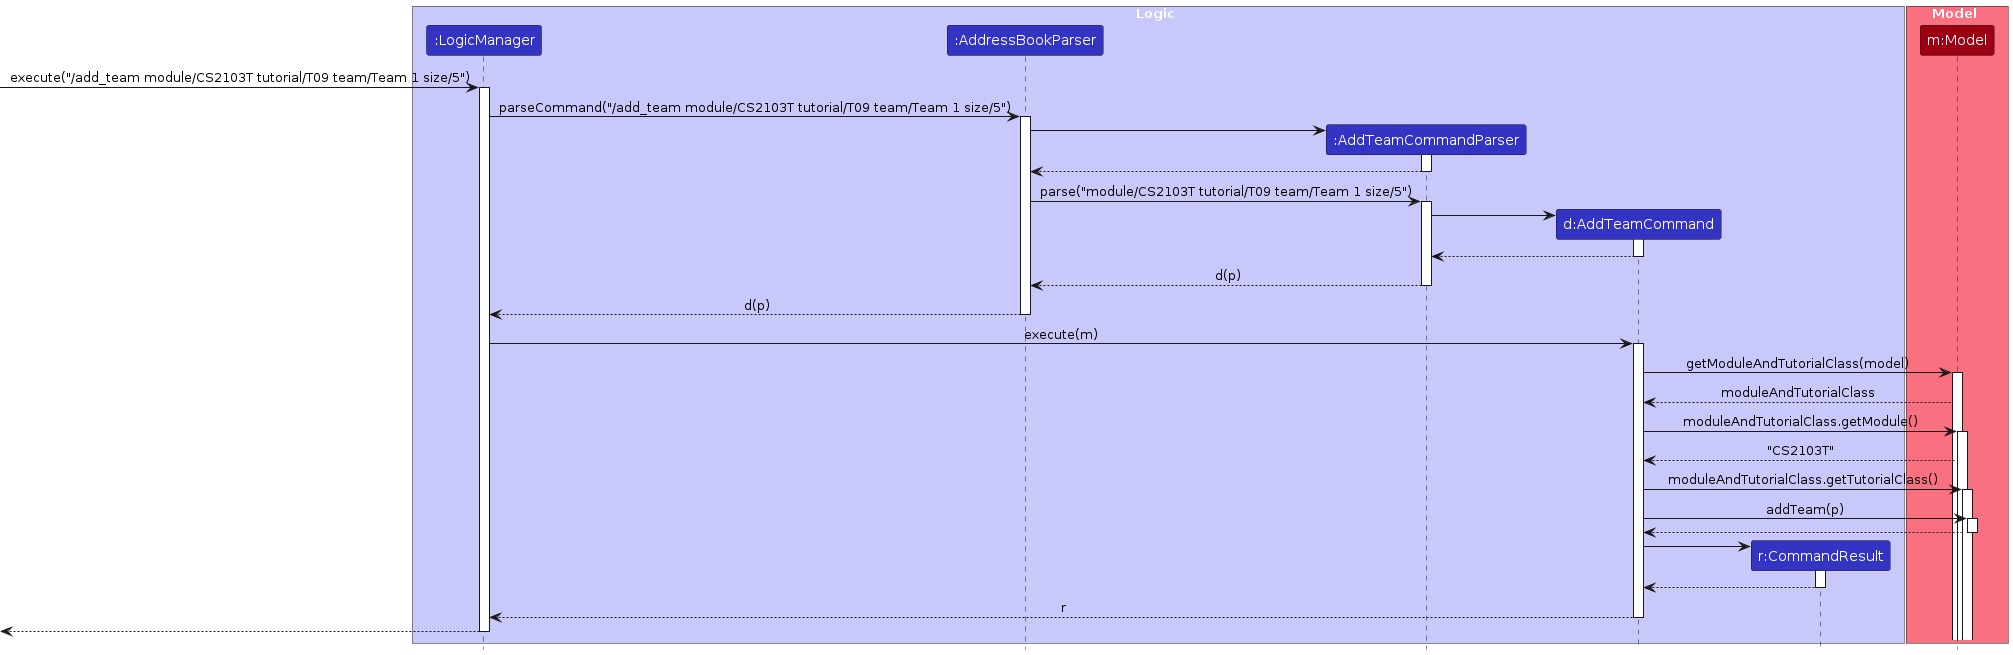
Example: /add_team module/CS2103 tutorial/T09 team/Team 1 size/5
Execution steps:
Step 1. The user inputs and executes /add_team module/CS2103 tutorial/T09 team/Team 1 size/5 command to add a team Team 1 of size 5 to the tutorial class T09 of module CS2103T
The execute command calls AddressBookParser#parseCommand(), which extracts the command word of the command and the arguments of the command.
Step 2. The AddressBookParser then creates a new AddTeamCommandParser and calls AddTeamCommandParser#parse(), with team/Team 1, size/5, module/CS2103T, tutorial/T09 as the arguments for the function.
Step 3. The AddTeamCommandParser parses the arguments and get the values of the user input associated with the prefixes, from there determine the team to add.
Important Note: Team name, module and tutorial must be specified with valid values. Size is an optional parameter. If size is not specified, the default size of the team is set to INTEGER.MAX_VALUE.
Step 4. Based on the prefixes, AddTeamCommandParser creates an AddTeamCommand object. Each command contains all the required prefixes and values to used to create the command object.
Step 5. LogicManager calls AddTeamCommand#execute(), passing Model as an argument. Within the execution process, the method retrieves the module and tutorial from the model. Within the tutorial, the method checks if a team with the same name exists. If such a team already exists, the method will return an error.
Important Note: Two teams are considered equal if and only if they have the same team name and belong to the same tutorial class, irregardless of size.
Throughout the process, error handling (e.g checking for valid module and tutorial class, making sure references passed are not null) is utilised to mitigate potential errors and ensure valid execution.
Step 6. Finally, a CommandResult is created and the team is added to the tutorial class specified.
Design considerations:
Aspect: Robustness:
- Alternative 1 (current choice): Using
nullto represent an optional team size cand tutorial class is required when adding classes into the TAHelper system, as well as user have to specify all fields, team name, module code and tutorial class in order to add a new team successfully.- Pros: Ensures that all teams are unique and not repeated. This helps facilitate other commands such as allocate student to teams to find a match in team easily without duplicates.
- Cons: Users may inadvertently provide incorrect or non-existent module codes or tutorial class identifiers, leading to errors in the system. This could result in frustration and a poor user experience.
- Alternative 2: Allow user to not specify team size when adding teams
- Pros: Users can add teams without needing to specify the team size immediately, allowing for greater flexibility in the workflow. They can add the team first and then specify the team size later, as needed. The input process is also streamlined, reducing the burden on users. This simplicity can lead to faster data entry and a more intuitive user experience.
- Cons: Users may inadvertently add too many students to the team if they do not specify the team size identifier accurately or if they forget to add it later. This could result in errors within the system.
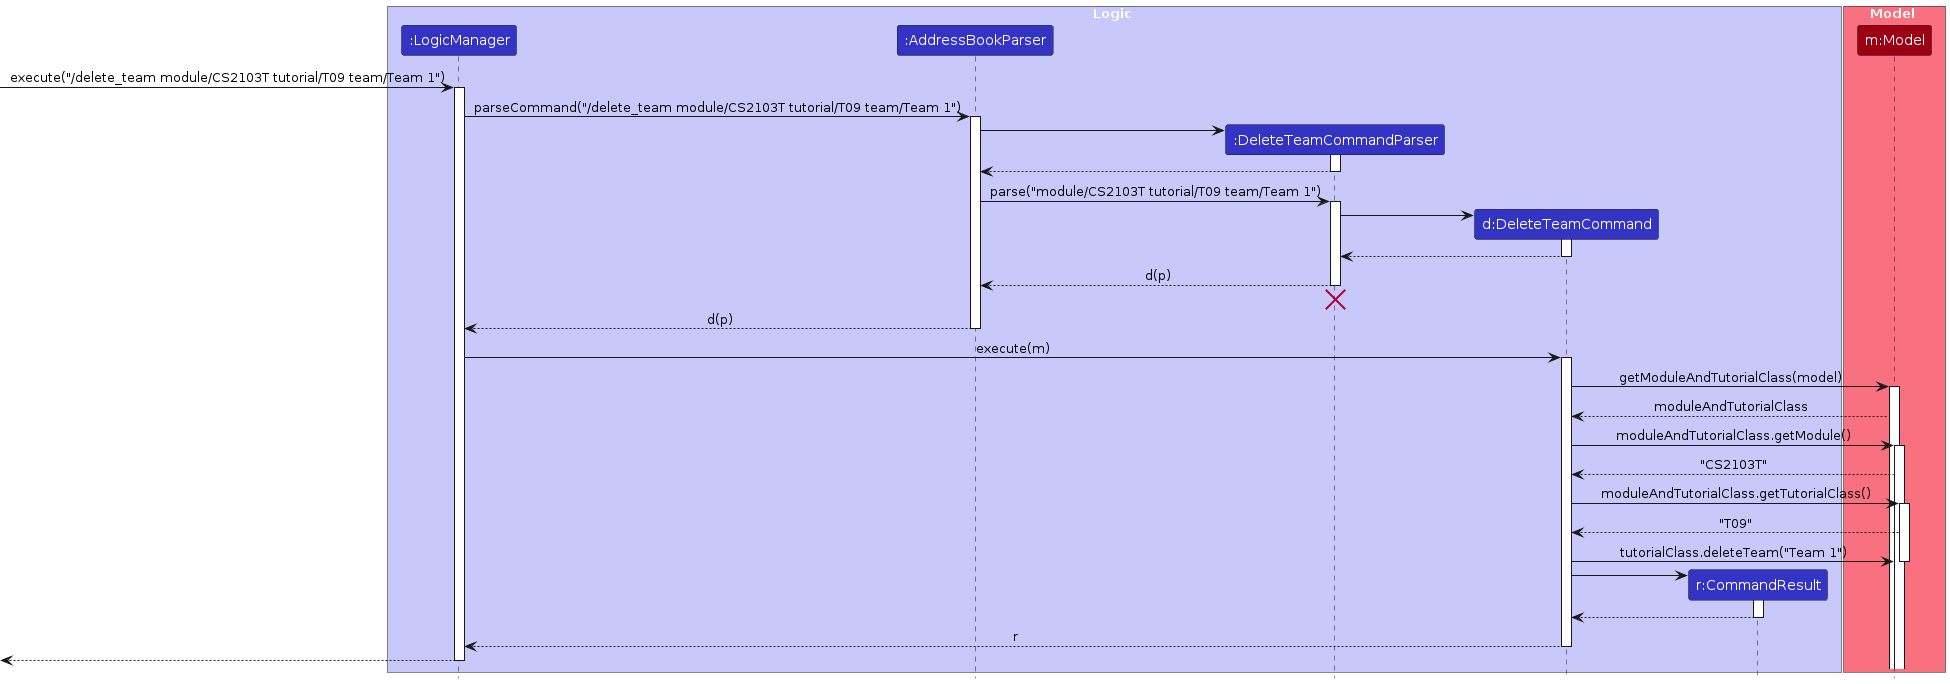
[Implemented] Delete team
The implementation of adding a class is facilitated by the DeleteTeamCommand and DeleteTeamCommandParser. DeleteTeamCommandParser implements the Parser interface and it's operations. DeleteTeamCommand extends the
Command class and contains auxiliary operations that supports the mechanism.
Given below is an example usage scenario and how the add mechanism behaves at each step.
Format: /delete_team module/MODULE tutorial/TUTORIAL team/TEAM_NAME
Example: /delete_team module/CS2103T tutorial/T09 team/Team 1
Execution steps:
Step 1. The user inputs and executes /delete_team module/CS2103T tutorial/T09 team/Team 1 command to delete a team Team 1 in tutorial T09 of module CS2103T.
The execute command calls AddressBookParser#parseCommand(), which extracts the command word of the command and the arguments of the command.
Step 2. The AddressBookParser then creates a new DeleteTeamCommandParser and calls DeleteTeamCommandParser#parse(), with team/Team 1, module/CS2103T, tutorial/T09 as the arguments for the function.
Step 3. The DeleteTeamCommandParser parses the arguments and get the values of the user input associated with the prefixes, from there determine the tutorial of the module to delete.
Important Note: All fields must be specified. There must be a valid value for module, tutorial and team, which must match with one of the values already present in the system to get achieve a successful delete. Additionally, two teams are considered equal if and only if they have the same team name and belong to the same tutorial class, irregardless of size.
Step 4. Based on the prefixes, DeleteTeamCommandParser creates an DeleteTeamCommand object. Each command contains all the required prefixes and values to used to create the command object.
Step 5. LogicManager calls DeleteTeamCommand#execute(), passing Model as an argument. Within the execution process, the method retrieves the module and tutorial from the model. Thereafter, it retrieves the team from the tutorial class.
Throughout the process, error handling (e.g checking for valid module, tutorial and team, making sure references passed are not null) is utilised to mitigate potential errors and ensure valid execution.
Step 6. Finally, a CommandResult is created and the team is deleted from the TAHelper system.
Design considerations:
Aspect: Functionality:
Alternative 1 (current choice): Team size is not included in equality check of teams.
- Pros:
- Simplification of team identity: Excluding team size simplifies the concept of what defines a team, making it easier to manage teams, especially if the team size changes. In most cases, team size is less relevant to its identity and more about its functional role or participation
- Cons:
- Potential for ambiguity/Inaccurate representation: Not considering team size might lead to situations where teams with the same name but of different sizes are treated the same, which can cause issues in contexts where size is a significant factor. However, this is mitigated by also including tutorial class in the equality check (i.e there can be multiple teams of the same name within the system as long as they are in different tutorials)
- Pros:
Alternative 2 : Team size is included in equality check of teams.
- Pros:
- Precision: Including team size allows the system to distinguish between teams more precisely.
- Data integrity: This method can prevent confusion or errors in operations where the specific composition of the team (including its size) is crucial, especially for future enhancements such as scheduling.
- Cons:
- Complexity in team management: might complicate the management of teams, especially in dynamic settings where team sizes can fluctuate. Changes in team size would necessitate creating a new team or redefining the team entity.
- Pros:
[Implemented] Allocate student to team
The implemented allocate mechanism is facilitated by the common class AllocateStudentToTeamCommand along with its specific commands AllocateStudentToTeamByEmailCommand, AllocateStudentToTeamByIdCommand and AllocateStudentToTeamByIndexCommand, as well as the parser AllocateStudentToTeamCommandParser.
AllocateStudentToTeamCommandParser implements the Parser interface and its operations.
AllocateStudentToTeamCommand extends the Command class and contains auxiliary operations that supports the mechanism, such as retrieving the target tutorial class. Each of the following commands further extends AllocateStudentToTeamCommand based on its specific functionality:
AllocateStudentToTeamByEmailCommand— Allocate student based on specified email to a team.AllocateStudentToTeamByIdCommand— Allocate student based on specified student ID to a team.AllocateStudentToTeamByIndexCommand— Allocate student based on specified index (viewable from the UI) to a team.
Given below is an example usage scenario and how the add mechanism behaves at each step.
Format: /allocate_team [id/ID] [email/EMAIL] [index/INDEX] module/MODULE tutorial/TUTORIAL team/TEAMNAME
*Only 1 of the 3 optional parameters (id, email, index) must be specified.
Example: /allocate_team id/A0123456X module/CS2103T tutorial/T09 team/Team 1
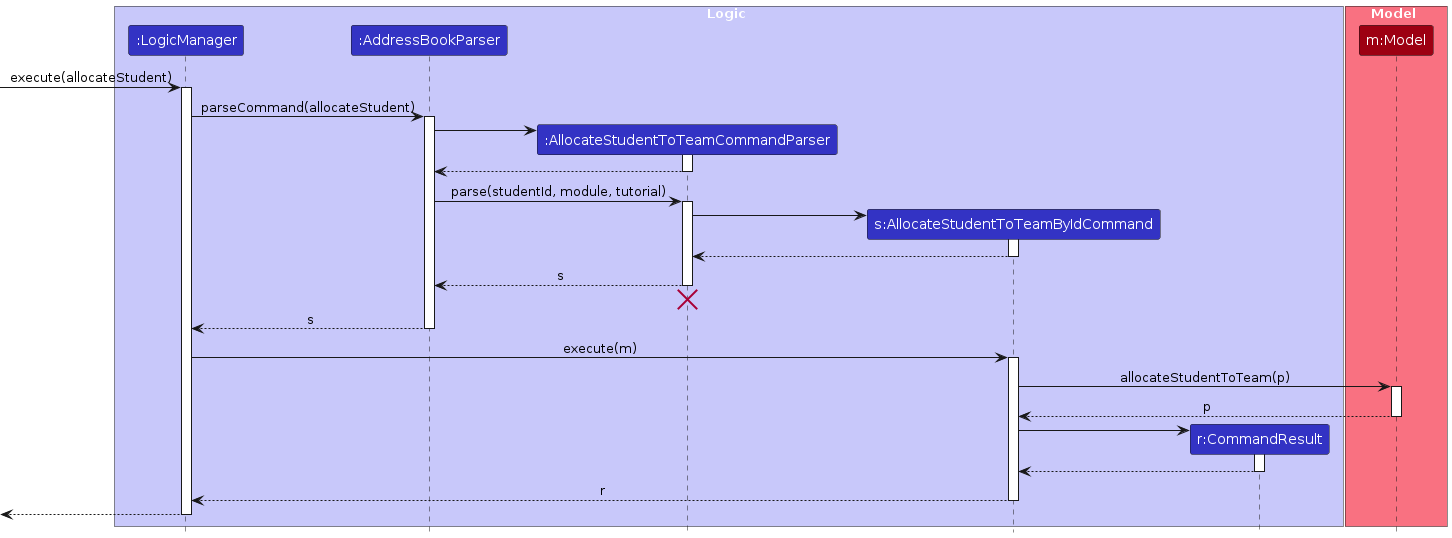
Step 1. The user executes /allocate_team id/A0123456X module/CS2103T tutorial/T09 team/Team 1 command to add the particular student with ID A0123456X to team Team 1 in the tutorial class T09 of module CS2103T.
The execute command calls AddressBookParser#parseCommand(), which extracts the command word of the command and the arguments of the command.
Step 2. The AddressBookParser then creates a new AllocateStudentToTeamCommandParser and calls AllocateStudentToTeamCommandParser#parse(), with id/A01234567X, module/CS2103T, tutorial/T09 and team/Team 1 as the arguments.
Step 3. The AllocateStudentToTeamCommandParser parses the arguments to determine what parameter is used to specify the target student (email, index or id). Additionally, the TutorialTeam, ModuleCode and TutorialClass are determined.
Important Note: The team, tutorial class and module code must be specified. To determine the target student, only one prefix should be used per command. If there are multiple prefixes, the target priority is as follows: By Student ID -> By Email -> By Index
Step 4. Based on the prefix used, AllocateStudentToTeamCommandParser creates the specific AllocateStudentToTeamCommand accordingly. Each command contains the information it needs to add the target student into a tutorial team.
Step 5. LogicManager calls AllocateStudentToTeamCommand#execute(), passing Model as an argument. This method retrieves the target module and tutorial class. Then, the method retrieves the student to add using the defined value. Throughout the process, error handling (e.g checking for invalid student/module/tutorial/team) is utilised to mitigate potential discrepancies and ensure valid execution.
Step 6. Finally, a CommandResult is created and the student is added to the tutorial team.
Design considerations:
Aspect: Modularity and extensibility:
- Alternative 1 (current choice): Separate each specific command into a different class, while overlapping code is abstracted to a common class in which the different classes can extend from.
- Pros: Specific commands are instantiated and thus can be easily traced and is more readable. Any reusable code is defined in the common class which can then be reused by the subclasses. Logic of the program is also more well-defined and behaviours related to one form of allocate command can be grouped together.
- Cons: May have duplicate code to a certain extent.
- Alternative 2: Lump into one generic command that handles each parameter accordingly.
- Pros: Reduces duplicate code and slightly cleaner to a certain extent. (i.e only 1 command class is executed).
- Cons: The logic handling may be slightly more complex and messy within the class as all parameters have to be dealt with separately (potentially using different logic).
[Implemented] Randomly allocate students to teams in tutorial class
The implemented random allocation mechanism is facilitated by the class RandomTeamAllocationCommand, as well as the parser RandomTeamAllocationCommandParser.
RandomTeamAllocationCommandParser implements the Parser interface and its operations.
RandomTeamAllocationCommand extends the Command class and contains auxiliary operations that supports the mechanism, such as retrieving the target tutorial class.
Format: /random_teams module/MODULE tutorial/TUTORIAL teams/NUMBER_OF_TEAMS
Example: /random_teams module/CS2103T tutorial/T09 teams/2
Step 1. The user executes /random_teams module/CS2103T tutorial/T09 teams/2 command to randomly allocate the students in tutorial class T09 of module CS2103T into 2 different teams.
The execute command calls AddressBookParser#parseCommand(), which extracts the command word of the command and the arguments of the command.
Step 2. The AddressBookParser then creates a new RandomTeamAllocationCommandParser and calls RandomTeamAllocationCommandParser#parse(), with module/CS2103T, tutorial/T09 and teams/2 as the arguments.
Step 3. The RandomTeamAllocationCommandParser parses the arguments to determine the parameters based on the user input. The ModuleCode, TutorialClass and NumberOfTeams are determined.
Step 4. Based on the prefix given, RandomTeamAllocationCommandParser creates a new RandomTeamAllocationCommand accordingly. Each command contains the information it needs to randomly allocate all the students in the tutorial class into different teams.
Step 5. LogicManager calls RandomTeamAllocationCommand#execute(), passing Model as an argument. This method retrieves the target module and tutorial class. Then, the method retrieves the number of teams to split the list of students into. Throughout the process, error handling (e.g checking for invalid module/tutorial/number) is utilised to mitigate potential discrepancies and ensure valid execution.
Step 6. Finally, a CommandResult is created and the list of students in the tutorial class is randomly allocated into the number of teams specified.
Design considerations:
Aspect: Functionality:
Alternative 1 (current choice): Randomly allocates the list of students into different teams, and delete all the current existing teams in the tutorial class first before doing the allocation.
- Pros:
- Allocation is not hindered by existing teams: Existing teams being present in the tutorial class will not cause incorrect allocation of students, and ensure all students get allocated properly.
- Cons:
- Potential Data Loss: Teams can be formed for various purposes and may not only have 1 set of teams. Deleting all existing teams before randomly allocating can cause data from the other teams, used for other purpose, to be lost.
- Pros:
Alternative 2 : Does not delete all existing teams in the tutorial class. Instead, each time the random allocation command is run, a new set of teams is created, and stored in the tutorial class.
- Pros:
- No assumptions made: The command does not make any assumptions about the purpose of the existing teams in the tutorial class.
- Cons:
- Complexity in implementation: This implementation may be very complex and difficult to implement. Furthermore, if not done well, it can lead to a lot of bugs.
- Pros:
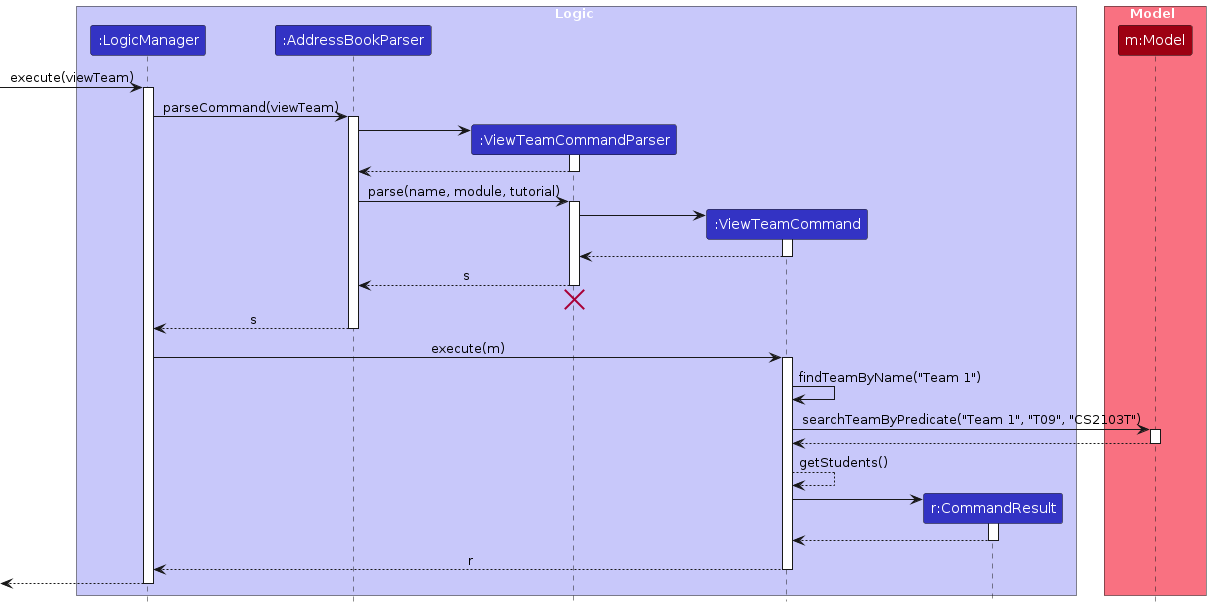
[Implemented] View team
The implementation of viewing a team is facilitated by the ViewTeamCommand and ViewTeamCommandParser. ViewTeamCommandParser implements the Parser interface and it's operations. ViewTeamCommand extends the
Command class and displays team information based on the parameter of team passed in. It supports the following Parameters:
Name— Search and display team information based on team name.Index— Search and display team information based on index of team in the tutorial class.
Given below is an example usage scenario and how the add mechanism behaves at each step.
Example: /view_teams name/Team 1 module/CS2103T tutorial/T09
Execution steps:
Step 1. The user inputs and executes /view_teams name/Team 1 module/CS2103T tutorial/T09 command to view team Team 1 of the tutorial class T09 in module CS2103T.
The execute command calls AddressBookParser#parseCommand(), which extracts the command word of the command and the arguments of the command.
Step 2. The AddressBookParser then creates a new ViewTeamCommandParser and calls ViewTeamCommandParser#parse(), with name/Team 1, module/CS2103T, tutorial/T09 as the arguments for the function.
Step 3. The ViewTeamCommandParser parses the arguments and get the values of the user input associated with the prefixes, from there determine the team to add.
Important Note: All fields must be specified. There must be a valid value for name, module and tutorial. Tags here are optional and need not be specified.
Step 4. Based on the prefixes, ViewTeamCommandParser creates an ViewTeamCommand object. Each command contains all the required prefixes and values to used to create the command object.
Step 5. LogicManager calls ViewTeamCommand#execute(), passing Model as an argument. This method retrieves the target team in the tutorial class of the module.
Throughout the process, error handling (e.g making sure references passed are not null) is utilised to mitigate potential errors and ensure valid execution.
Step 6. Finally, a CommandResult is created and the information of the team is displayed.
Design considerations:
Aspect: Modularity and extensibility:
- Alternative 1 (current choice): Only one parameter allowed per command.
- Pros: Easy to implement.
- Cons: Does not allow users to fine tune searches based on multiple fields.
- Alternative 2: Allow for multiple parameters.
- Pros: Users can filter searches to a higher degree
- Cons: Handling combinations of different fields could be complex
[Implemented] Delete student from team
The implemented add mechanism is facilitated by the abstract DeleteStudentFromTeamCommand along with its specific commands DeleteStudentFromTeamByEmailCommand, DeleteStudentFromClassByIdCommand and DeleteStudentFromTeamByIndexCommand, as well as the parser DeleteStudentFromTeamCommandParser.
DeleteStudentFromTeamCommandParser implements the Parser interface and its operations.
DeleteStudentFromTeamCommand extends the Command class and contains auxillary operations that supports the mechanism, such as retrieving the target tutorial team. Each of the following commands further extends DeleteStudentFromTeamCommand based on its specific functionality:
DeleteStudentFromTeamByEmailCommand— Delete student from team based on specified email from a tutorial team.DeleteStudentFromTeamByIdCommand— Delete student from team based on specified student id from a tutorial team.DeleteStudentFromTeamByIndexCommand— Delete student from team based on specified index (viewable from the UI) from a tutorial team.
Given below is an example usage scenario and how the add mechanism behaves at each step.
Example: /delete_student_from_team id/A01234567X module/CS2103T tutorial/T09 team/4

Step 1. The user executes /delete_student_from_team id/A01234567X module/CS2103T tutorial/T09 team/4 command to delete the particular student with id A01234567X from the module CS2103T and tutorial class T09 and team 4.
The execute command calls AddressBookParser#parseCommand(), which extracts the command word of the command and the arguments of the command.
Step 2. The AddressBookParser then creates a new DeleteStudentFromTeamCommandParser and calls DeleteStudentFromTeamCommandParser#parse(), with id/A01234567X, module/CS2103T, tutorial/T09 and team/4 as the arguments.
Step 3. The DeleteStudentFromTeamCommandParser parses the arguments to determine what parameter is used to specify the target student (email, index or id). Additionally, the ModuleCode, TutorialClass and Team is determined.
Important Note: The tutorial class, module code and team must be specified. To determine the target student, only one prefix should be used per command. If there are multiple prefixes, the target priority is as follows: By Index -> By Student ID -> By Email
Step 4. Based on the prefix used, DeleteStudentFromTeamCommandParser creates the specific DeleteStudentFromTeamCommand accordingly. Each command contains a specific predicate to find the student.
Step 5. LogicManager calls DeleteStudentFromTeamCommand#execute(), passing Model as an argument. This method retrieves the target module, tutorial class and team. Then, the method retrieves the student to delete using the defined predicate. Throughout the process, error handling (e.g. checking for invalid student/module/tutorial/team) is utilised to mitigate potential discrepancies and ensure valid execution.
Step 6. Finally, a CommandResult is created and the student is deleted from the team.
Design considerations:
Aspect: Modularity and extensibility:
- Alternative 1 (current choice): Seperate each specific command into a different class, while overlapping code is abstracted to an abstract class.
- Pros: Specific commands are instantiated and thus can be easily traced and is more readable. Any reusable code is defined in the abstract class which can then be reused by the subclasses.
- Cons: May have duplicate code to a certain extent.
- Alternative 2: Lump into one generic command that handles each parameter accordingly.
- Pros: Reduces duplicate code and much cleaner (i.e only 1 command class is executed).
- Cons: The logic handling may be slightly more complex and messy within the class as all parameters have to be dealt with seperately (potentially using different logic).
Documentation, logging, testing, configuration, dev-ops
Appendix: Requirements
Product scope
Target user profile:
- has a need to manage a significant number of students' contacts
- prefer desktop apps over other types
- can type fast
- prefers typing to mouse interactions
- is reasonably comfortable using CLI apps
Value proposition: manage students' contacts faster than a typical mouse/GUI driven app
User stories
Priorities: High (must have) - * * *, Medium (nice to have) - * *, Low (unlikely to have) - *
| Priority | Iteration | As a … | I want to … | So that I can… |
|---|---|---|---|---|
* * * | v1.2 | TA | add new students to a class | maintain an up-to-date list of enrolled students. |
* * * | v1.2 | TA | add partial info of students | still add students even if I don’t have all their information. |
* * * | v1.2 | TA | delete a student from my class if they drop the module/class | keep my class list accurate and up-to-date. |
* | v1.2 | TA | search for my students based on their NUS ID, emails, names or tutorial groups | locate details of students without having to go through the entire list |
* * * | v1.2 | TA | view all students and their particulars | have a comprehensive overview of the enrolled students that I teach. |
* * | v1.2 | TA | view all the tutorial classes and their student composition | have an overview of the classes that I am teaching. |
* * | v1.2 | TA | add a tutorial class that I am teaching. | track a tutorial class and the students in it. |
* * | v1.2 | TA | remove a tutorial class that I am teaching. | remove any unrelated classes that I do not want to no longer want to keep track of. |
* | v1.2 | TA | add students to a tutorial class | assign students to a tutorial class and teams within the class. |
* * | v1.3 | TA | edit a student's information | amend a student's detail in case there are any errors or changes. |
* | v1.3 | TA | sort students based on their name, student ID or email. | easily organise and manage student records. |
* * * | v1.3 | TA | create a new team for a tutorial class | segregate students to teams within a tutorial class. |
* * * | v1.3 | TA | delete a team from a tutorial class | remove unnecessary teams and organise my classes. |
* * * | v1.3 | TA | list all students in a particular tutorial class | see a comprehensive overview of the enrolled students in each class |
* * * | v1.3 | TA | delete a student from my class | amend if they drop the module/class. |
* * * | v1.3 | TA | search for students based on tutorial group | send tasks to students from 1 class |
* * * | v1.3 | TA | delete module from the system | remove modules I accidentally keyed in. |
* * * | v1.3 | TA | randomly generate team allocations | fairly group my students into different teams for group tasks. |
* * * | v1.3 | TA | view team composition | see a comprehensive overview of the students in each team |
* * * | v1.3 | TA | delete a student from a team | change the members of the team. |
* * * | v1.3 | TA | allocate students into teams | form teams for class projects and assignments. |
Use cases
(For all use cases below, the System is the TA Helper and the Actor is the TA, unless specified otherwise)
Use case 1: Add new students
MSS:
- User specifies the student to be added.
- System adds the student to the list of students.
- System indicates successful addition of new student. Use case ends.
Extensions:
- 1a. Student's name, email, id is not specified.
- 1a1. Returns an error that informs the user to specify the missing field(s).
- Use case ends.
- 1b. The specified email and/or id is tagged to an existing student in the list.
- 1b1. Returns an error indicating that there is an existing entry with the same value.
- Use case ends.
- 1c. Invalid input command.
- 1c1. Return an error indicating that command is not recognised and provides the correct command format.
- Use case ends.
- 2a. Student's tutorial class is not specified.
- 2a1. System adds student into the list of students.
- 2a2. Student will not be placed under any tutorial group.
- Use case ends.
Use case 2: Delete students
MSS:
- User specifies the student to be deleted.
- System deletes the student from the list of students and tutorial group (if any). Use case ends.
Extensions:
- 1a. User specifies to delete student by student ID.
- 1a1. Student ID does not exist in the system.
- 1a1.1: Returns an error indicating that the student with the provided ID does not exist.
- Use case ends.
- 1a1. Student ID does not exist in the system.
- 1b. User specifies to delete student by email.
- 1b1. Email does not exist in the system.
- 1b1.1. Returns an error indicating that the student with the provided email does not exist.
- Use case ends.
- 1b1. Email does not exist in the system.
- 1c. Invalid input command.
- 1c1: Returns an error indicating command not recognised and provides the correct command format.
- 1c1: Returns an error indicating command not recognised and provides the correct command format.
Use case 3: Edit students
MSS
- User specifies the student to be edited along with the new information.
- System edits the student from the list of students. Use case ends.
Extensions:
- 1a. User specifies the same information as the student to be edited
- 1a1: Returns an error indicating that the student already exists.
- Use case ends.
- 1b. User specifies to edit student's ID.
- 1b1. Student ID already exists in the system.
- 1b1.1: Returns an error indicating that the student with the provided ID already exists.
- Use case ends.
- 1b1. Student ID already exists in the system.
- 1c. User specifies to edit student's email.
- 1c1. Email already exists in the system.
- 1c1.1. Returns an error indicating that the student with the provided email already exists.
- Use case ends.
- 1c1. Email already exists in the system.
- 1d. Invalid index.
- 1d1. Index does not exist in the system.
- 1d1.1: Returns an error indicating that the index is out of bounds.
- Use case ends.
- 1d1. Index does not exist in the system.
- 1e. Invalid input command.
- 1e1: Returns an error indicating command not recognised and provides the correct command format.
- Use case ends.
Use case 4: Search for students
MSS:
- User specifies the student to be searched for.
- System generates a list of matching entries according to specified parameters. Use case ends.
Extensions:
- 1a. Parameter not specified
- 1a1/2a1. Returns an error indicating that the user needs to specify valid fields.
- Use case ends.
- 1b. Invalid input command.
- 1b1. Return an error indicating command not recognised and provides the correct command format.
- Use case ends.
- 2a. Partial match for specified parameter.
- 2a1. System will display all matching results for the specified value.
- 2a1. System will display all matching results for the specified value.
Use case 5: View all students
MSS:
- User wants to view all students' information.
- System displays all the student's information (name, email, student id). Use case ends.
Extensions:
- 1a. Invalid input command.
- 1a1. Return an error indicating command not recognised and provides the correct command format.
- Use case ends.
- 1b. Additional arguments are specified after the command.
- 1b1. System will ignore those arguments and execute the command as usual.
- 2a. No existing students in the list.
- 2a1. System will return a message indicating that there are no students in the list.
- 2a1. System will return a message indicating that there are no students in the list.
Use case 6: Sort students
MSS:
- User specifies to sort the list by a specified parameter.
- System shows a sorted list of all students. Use case ends.
Extensions:
- 1a. User specifies to sort the list by an invalid parameter.
- 1a1. Returns an error indicating parameter is not valid for sorting.
- Use case ends.
- 1b. Invalid input command.
- 1b1: Returns an error indicating command not recognised and provides the correct command format.
- Use case ends.
Use case 7: Add new tutorial class
MSS:
- User specifies the class to be added.
- System adds the tutorial class. Use case ends.
Extensions:
- 1a. Invalid input command.
- 1a1. Return an error indicating command not recognised and provides the correct command format.
- Use case ends.
- 1b. Invalid tutorial class attributes are specified.
- 1b1. Returns an error indicating that user has to specify tutorial class in the correct format.
- Use case ends.
- 1c. The specified tutorial class already exists.
- 1c1: Returns an error indicating that the tutorial class already exists
- Use case ends.
Use case 8: Delete tutorial class
MSS:
- User specifies the class to be deleted.
- System deletes the tutorial class. Use case ends.
Extensions:
- 1a. Invalid input command.
- 1a1. Return an error indicating command not recognised and provides the correct command format.
- Use case ends.
- 1b. The tutorial class specified does not exist.
- 1b1. Returns an error indicating invalid tutorial class and shows the list of tutorial classes available.
- Use case ends.
Use case 9: View all classes
MSS
- User wants to view all classes.
- System shows a list of all available classes. Use case ends.
Extensions
- 1a. Invalid input command.
- 1a1. Return an error indicating command not recognised and provides the correct command format.
- Use case ends.
- 1b. Additional arguments are specified after the command.
- 1b1. System will ignore those arguments and execute the command as usual.
- 2a. There are no existing classes.
- 2a1. System will return a message indicating that there are no existing classes in the list.
- 2a1. System will return a message indicating that there are no existing classes in the list.
Use case 10: Delete module
MSS:
- User specifies the module to be deleted.
- System deletes the module. Use case ends.
Extensions:
- 1a. Invalid input command.
- 1a1. Return an error indicating command not recognised and provides the correct command format.
- Use case ends.
- 1b. The module specified does not exist.
- 1b1. Returns an error indicating invalid module.
- Use case ends.
Use case 11: Add student to class
MSS:
- User specifies the student to be added, along with the module code and tutorial class to add the student to.
- System adds the student from the list of students to the tutorial class. Use case ends.
Extensions:
- 1a. User specifies to add student by student ID.
- 1a1. Student ID does not exist in the system.
- 1a1.1: Returns an error indicating that the student with the provided ID does not exist.
- Use case ends.
- 1a1. Student ID does not exist in the system.
- 1b. User specifies to add student by email.
- 1b1. Email does not exist in the system.
- 1b1.1. Returns an error indicating that the student with the provided email does not exist.
- Use case ends.
- 1b1. Email does not exist in the system.
- 1c. User specifies to add student by index.
- 1c1. Index does not exist in the tutorial class.
- 1c1.1. Returns an error indicating that the student with the provided index does not exist.
- Use case ends.
- 1c1. Index does not exist in the tutorial class.
- 1d. Invalid module specified.
- 1d1: Returns an error indicating that the module does not exist.
- Use case ends.
- 1e. Invalid tutorial specified.
- 1e1: Returns an error indicating that the tutorial does not exist in the specified module.
- Use case ends.
- 1f. Invalid input command.
- 1f1: Returns an error indicating command not recognised and provides the correct command format.
- Use case ends.
Use case 12: Delete student from class
MSS:
- User specifies the student to be deleted and the module code and tutorial class name of the class to be deleted from.
- System deletes the student from the list of students in the tutorial class. Use case ends.
Extensions:
- 1a. User specifies to delete student by student ID.
- 1a1. Student ID does not exist in the system.
- 1a1.1: Returns an error indicating that the student with the provided ID does not exist.
- Use case ends.
- 1a1. Student ID does not exist in the system.
- 1b. User specifies to delete student by email.
- 1b1. Email does not exist in the system.
- 1b1.1. Returns an error indicating that the student with the provided email does not exist.
- Use case ends.
- 1b1. Email does not exist in the system.
- 1c. User specifies to delete student by index.
- 1c1. Index does not exist in the tutorial class.
- 1c1.1. Returns an error indicating that the student with the provided index does not exist.
- Use case ends.
- 1c1. Index does not exist in the tutorial class.
- 1d. Invalid module specified.
- 1d1: Returns an error indicating that the module does not exist.
- Use case ends.
- 1e. Invalid tutorial specified.
- 1e1: Returns an error indicating that the tutorial does not exist in the specified module.
- Use case ends.
- 1f. Invalid input command.
- 1f1: Returns an error indicating command not recognised and provides the correct command format.
- Use case ends.
Use case 13: View all students in a class
MSS
- User wants to view all students in a class.
- System shows a list of all students in the class.
- 1a. Invalid input command.
- 1a1. Return an error indicating command not recognised and provides the correct command format.
- Use case ends.
- 1b. Additional arguments are specified after the command.
- 1b1. System will ignore those arguments and execute the command as usual.
- 2a. There is no class matching the specified class.
- 2a1. System will return a message indicating that there is no such class in the list.
- 2b. There are no students in the class.
- 2b1. System will return a message indicating that there are no existing students in the class in the list.
- 2b1. System will return a message indicating that there are no existing students in the class in the list.
Use case 14: Add new tutorial team
MSS:
- User specifies the team to be added, along with the module and tutorial class to add the team to.
- System adds the tutorial team to the tutorial class. Use case ends.
Extensions:
- 1a. Invalid input command.
- 1a1. Return an error indicating command not recognised and provides the correct command format.
- Use case ends.
- 1b. Invalid tutorial team attributes are specified.
- 2a1. Returns an error indicating that user has to specify tutorial team in the correct format.
- Use case ends.
- 1c. Invalid module specified.
- 1c1: Returns an error indicating that the module does not exist.
- Use case ends.
- 1d. Invalid tutorial specified.
- 1d1: Returns an error indicating that the tutorial does not exist in the specified module.
- Use case ends.
- 1e. The specified tutorial team (i.e with same name) already exists.
- 1e1: Returns an error indicating that the tutorial team already exists in the specified module and tutorial.
- Use case ends.
Use case 15: Delete tutorial team
MSS:
- User specifies the team to be deleted, along with the module and tutorial class to delete the team from.
- System deletes the tutorial team from the tutorial class. Use case ends.
Extensions:
- 1a. Invalid input command.
- 1a1. Return an error indicating command not recognised and provides the correct command format.
- Use case ends.
- 1b. Invalid module specified.
- 1b1: Returns an error indicating that the module does not exist.
- Use case ends.
- 1c. Invalid tutorial specified.
- 1c1: Returns an error indicating that the tutorial does not exist in the specified module.
- Use case ends.
- 1d. The tutorial team specified does not exist in the specified module and tutorial.
- 1d1. Returns an error indicating tutorial team does not exist.
- Use case ends.
Use case 16: Delete student from team
MSS:
- User specifies the student to be deleted.
- System deletes the student from the list of students and tutorial group (if any). Use case ends.
Extensions:
- 1a. User specifies to delete student by student ID.
- 1a1. Student ID does not exist in the system.
- 1a1.1: Returns an error indicating that the student with the provided ID does not exist.
- Use case ends.
- 1a1. Student ID does not exist in the system.
- 1b. User specifies to delete student by email.
- 1b1. Email does not exist in the system.
- 1b1.1. Returns an error indicating that the student with the provided email does not exist.
- Use case ends.
- 1b1. Email does not exist in the system.
- 1c. User specifies to delete student by index.
- 1c1. Index does not exist in the tutorial class.
- 1c1.1. Returns an error indicating that the student with the provided index does not exist.
- Use case ends.
- 1c1. Index does not exist in the tutorial class.
- 1d. Invalid module specified.
- 1d1: Returns an error indicating that the module does not exist.
- Use case ends.
- 1e. Invalid tutorial specified.
- 1e1: Returns an error indicating that the tutorial does not exist in the specified module.
- Use case ends.
- 1f. Invalid team specified.
- 1f1: Returns an error indicating that the team does not exist in the specified tutorial.
- Use case ends.
- 1g. Invalid input command.
- 1g1: Returns an error indicating command not recognised and provides the correct command format.
- Use case ends.
Use case 17: Allocate Student to tutorial team
MSS
- User specifies the student id of the student, the module code, tutorial class, and the tutorial team name in the tutorial class to allocate the student into.
- User enters the command and along with the details.
- System allocates student into tutorial team and displays a message. Use case ends.
Extensions
- 1a. The specified student is not in the system.
- 1a1. TAHelper returns an error indicating that student is not in the system.
- Use case ends.
- 1b. The specified student is not in the tutorial class of the specified module.
- 1b1. TAHelper returns an error indicating that student needs to be in the specified tutorial class of the specified module first.
- Use case ends.
- 1c. The specified tutorial team is not in the tutorial class.
- 1c1: TAHelper returns an error indicating that the team does not exist in the tutorial class.
- Use case ends.
- 1d. The tutorial class is not in the system.
- 1d1: TAHelper returns an error indicating that the tutorial class is not in the specified module.
- Use case ends.
Use case 18: Randomly allocating a list of students in the tutorial class into teams.
MSS
- User specifies the module code, tutorial class, and number of teams to split the list of students in the tutorial class into.
- User enters the command along with the details.
- System allocates the list of students in the tutorial class into different tutorial teams and displays a message. Use case ends.
Extensions
- 1a. The specified tutorial class does not exist under the module specified.
- 1a1. TAHelper returns an error message.
- Use case ends.
- 1b. The specified module does not exist.
- 1b1. TAHelper returns an error message indicating that module does not exist in the system.
- Use case ends.
- 1c. The specified number of teams is invalid.
- 1c1. TAHelper returns an error message indicating that the number of teams is invalid.
- Use case ends.
Use case 19: View team information
MSS
- User wants to view information of a particular team in a class.
- System shows the information of the team in the class.
- 1a. The specified student is not in the system.
- 1a1. TAHelper returns an error indicating that student is not in the system.
- Use case ends.
- 1b. The specified student is not in the tutorial class of the specified module.
- 1b1. TAHelper returns an error indicating that student needs to be in the specified tutorial class of the specified module first.
- Use case ends.
- 1c. The specified tutorial team is not in the tutorial class.
- 1c1: TAHelper returns an error indicating that the team does not exist in the tutorial class.
- Use case ends.
- 1d. The tutorial class is not in the system.
- 1d1: TAHelper returns an error indicating that the tutorial class is not in the specified module.
- Use case ends.
Non-Functional Requirements
- Should work on any mainstream OS as long as it has Java
11or above installed. - Should be able to hold up to 1000 persons without a noticeable sluggishness in performance for typical usage.
- A user with above average typing speed for regular English text (i.e. not code, not system admin commands) should be able to accomplish most of the tasks faster using commands than using the mouse.
- Should respond to user inputs within approximately 2-3 seconds.
- Should not depend on internet access to accomplish its core purpose.
- Should provide a simple and user-friendly GUI, focusing on readability and ease of use.
- Should be usable by a person who is TA-ing for the first time.
- Should provide comprehensive error messages and guidelines to recover from errors due to user input.
- Should provide a comprehensive and well-designed user documentation to guide users on how to use TAHelper.
- Should provide a comprehensive and well-designed developer documentation to guide developer on how to improve and develop TAHelper further.
Glossary
- Mainstream OS: Windows, Linux, Unix, MacOS
- Private contact detail: A contact detail that is not meant to be shared with others
- TA (Teaching Assistant): An individual who is responsible for teaching a tutorial class of University students.
- TAHelper: A contact management application to help TAs keep track of students in classes they teach
- GUI: Graphical User Interface
- MSS: Main Success Scenario
Appendix: Instructions for manual testing
Given below are instructions to test the app manually.
Note: These instructions only provide a starting point for testers to work on; testers are expected to do more exploratory testing.
Launch and shutdown
Initial launch
Download the jar file and copy into an empty folder
Double-click the jar file Expected: Shows the GUI with a set of sample contacts. The window size may not be optimum.
Saving window preferences
Resize the window to an optimum size. Move the window to a different location. Close the window.
Re-launch the app by double-clicking the jar file.
Expected: The most recent window size and location is retained.
Adding a person
Adding a new person into the TAHelper system.
Prerequisites: NIL.
Test case 1: Entering
/add_student name/Dohn Joe email/johndoe@gmail.com id/A0123456Afor the first time
Expected: A new student is successfully added into the TAHelper system.Test case 2: Entering
/add_student name/Dohn Joe email/johndoe@gmail.com id/A6543210Awith the same email
Expected: An error message displayed. A person with the same email cannot be added because a student with the same email already exist in the TAHelper system.Test case 3:
/add_student name/Dohn Joe email/johndoe@gmail.com id/0123Expected: An error message is displayed as the input id value is invalid.Test case 4:
/add_student name/john email/john@gmail.com id/A9876543A tag/TuteeExpected: A new student is successfully added into the TAHelper system.
Deleting a person
Deleting a person while all persons are being shown
Prerequisites: List all persons using the
listcommand. Multiple persons in the list.Test case:
delete 1
Expected: First contact is deleted from the list. Details of the deleted contact shown in the status message. Timestamp in the status bar is updated.Test case:
delete 0
Expected: No person is deleted. Error details shown in the status message. Status bar remains the same.Other incorrect delete commands to try:
delete,delete x,...(where x is larger than the list size)
Expected: Similar to previous.
Allocating a student to a team in tutorial class.
Allocating a student to a team in the tutorial class by studentId, email or index that they belong to in the tutorial class list.
Prerequisites:
- The student (Person's object) should already been in the module's tutorial class list of students.
- The module and tutorial class in that module must already exist in the system.
- The team to allocate the student into must exist in that tutorial class.
- The student to allocate must already exist in TAHelper system.
To set up these prerequisites: visit [] to add student into tutorial class, and visit [] to add tutorial team into the tutorial class.
Test case 1 (Allocating by student id):
/allocate_team id/A9876543A module/CS2101 tutorial/T02 team/Team1Expected: Student successfully added to Team1 of tutorial T02.Test case 2 (Allocating by email) (Assuming Test case 1 is not executed on the same person):
/allocate_team email/Jared@example.com module/CS2101 tutorial/T02 team/Team1Expected: Student successfully added to Team1 of tutorial T02.Test case 3 (Allocating a student that is not in that tutorial group):
/allocate_team id/A1111111Z module/CS2101 tutorial/T02 team/Team1Expected: An error message is displayed indicating that the student needs to be in the tutorial group first.Test case 4 (Allocating a student that is not in the TAHelper system):
/allocate_team id/A0987654A module/CS2101 tutorial/T02 team/Team1Expected: An error message is played indicating that the student is not in TAHelper system.
Appendix: Planned Enhancements
Planned Enhancements
Team size: 5
1. Include command to delete all classes from a specified module
Current implementation
- Currently, there is no way to delete all classes from a specified module quickly, as we have to delete them one by one. For example, we can have a
/delete_all_classes module/MODULEcommand.
Proposed enhancement(s)
- A
/delete_all_classescommand could be implemented to help support this feature. This is different from/delete_moduleas this command deletes the module itself too, but/delete_all_classeswould leave the module itself intact.
2. Support for more tutorial class name formats
Current implementation
- Currently, our system only supports tutorial class names with 1 letter followed by 2 digits (e.g.
T01). This could result in errors when trying to use a valid tutorial class name (such asDTk1234'sTO43orCS2101'sSG15)
Proposed enhancement(s)
- Support as many types of tutorial class name types as possible, especially the more common ones.
Examples: 2 letters + 2 digits (e.g.TO43), 1 letter + 1 digit (e.g.T5)
3. Regular expression (regex) validation improvements
Current implementation
- Currently, the name class employs a slightly less strict regular expression in order to validate the name that users input when adding a new Person. This means that currently, the system accepts a Person's name that is solely consisting of integers. which in most cases, is not culturally accepted or possible in the world. Furthermore, it does not support names with higher complexity such as "Jai S/O John". However, such names are perfectly acceptable formats and such formats appear in many names in Singapore and around the world.
- Likewise, the email class employs a slightly less strict regular expression in order to validate the email that users input when adding a new Person. This means that user are able to input email format that is not a valid email by convention.
Current implementation only mainly checks if the
@symbol is present, and does not check if a valid domain has been entered.
Proposed enhancement(s)
- We look to implement a stricter validation regular expression (regex) for the name valid value so that the system is able to accept names that have special symbols in them. Furthermore, we also want to implement a regex expression that ensures that a Person's name cannot solely contain all integer values.
- We look to implement a stricter validation regular expression (regex) for the email valid value so that the system is only able to accept email values that are more appropriate and valid in terms of real world context.
This enhancements could come in the form of ensure that a valid domain name has been passed in, as well as ensuring that the
.comformat for the wider public or theu.nus.edu.sgformat for example, is specified in the context of NUS students.
4. More concise, detailed and descriptive error messages
Current implementation There are many instances where the error messages have confused users. For example,
- Currently, when a user tries to add a student with the same email or student id as any student in the system, the system will display a generic error message that tells user the person they want to add already exist in the system.
- Currently, the error message when the /allocate_team is ran with an invalid command format is "Invalid command format! /allocate_team: Allocates a student a team in the tutorial class". However, this does not indicate to users which part of the command format is incorrect or invalid, potentially making it difficult for users to identify the part of the command where they have input wrongly. However, it does not tell users which value, email or student id, clashes with another Person object in the system.
- Currently, the error message when the /random_teams is run with a module or tutorial class that does not exist is "Please check if you have entered an existing module and tutorial". However, this does not indicate to users whether module or tutorial does not exist in the system, which may potentially make it more difficult for users to identify whether it is module or class which does not exist.
- When handling teams, the error message might append
Teambefore the team name, which might confuse the user on whether the team name is1orTeam 1, for example.
Proposed enhancement(s)
- We look to implement a more detailed error message that specifies which field, email or id, or both, that violated the unique valid policy of a person object in the system. This way, it will improve user experience as users are able to fix the issue with more specific aid/help.
- We look to implement a more descriptive error message that tells user which part of the AllocateStudentToTeamCommand that cause the command to be invalid. This way users can adapt to the invalid input and correct it quickly, which improves user experience.
- We look to implement a more descriptive error message that tells user exactly whether module or tutorial class does not exist. This way users can adapt to the input values and correct it quickly, which improves user experience.
- We will also make the error messages more clear in highlighting the 'true' team name.
5. Add column labels on UI to improve readability.
Current implementation
- Current implementation for the columns does not show what the entries in the columns represent. Although we can safely assume that upon seeing the entries in each column, our target audience would be able to understand what the column means, but it can sometimes get confusing and overwhelming, especially for the last column, which handles the entries of students.
Proposed enhancement(s)
- Firstly, we look to implement a label that tells users that the left column represents the list of modules, middle column represents the list of tutorial classes in that module, and the right column represents the list of students.
- Secondly, we want to implement even more specific label, such as when user enters the module to view the list of classes for that module, the label for the middle column (the column displaying the list of tutorial classes) should show that something like 'CS2101 tutorial classes', something that is specific to the module.
- Thirdly, similar to point 2, we want to implement even more specific person column label, such as when user enters to view the list of students in a tutorial class, the label shows something like 'T01's class list'. This will greatly aid user's readability, and it is an enhancement we want to make.
6. Propagate students' edited information from EditCommand to other student lists
Current implementation
- When editing a student's information using
/edit_student, changes only appear on the list currently being displayed. - In order to sync a student information across modules, tutorial classes and teams, users would need to display the respective list in the UI and re-execute the command to make changes.
- This can be an inconvenience and could lead to difficulties in keeping track of changes.
Proposed enhancement(s)
- We look to improving the
/edit_studentcommand, such that it will propagate any changes made on a single student list to all other lists within the app. This allows for syncing of information across the different modules, tutorial classes and teams.
7. Improve the Random Allocation of students algorithm.
Current implementation
- Current implementation only checks if the randomly selected tutorial team to add the student to is full before randomly selecting another one to add the student into. This can be a problem if the user wants to split the students into many teams (For example: user inputs 5 teams to split 16 people into.). What we might see is that sometimes, there might be a disproportionate number of people in one group. Where some groups might not even have students inside.
Proposed enhancement(s)
- We will look into improving the random allocation algorithm, where the algorithm will allocate in batches, first batch ensuring that every team will have 1 member, next batch ensuring that they have 2 members, until the last batch where it will allocate the remaining students.
- It will be random too as the people in the first batch will be randomly generated and then removed after being added, and so on.
8. Add custom exceptions
Current implementation
- When an error occurs, the command will return a generic command exception along with the specified error message. However, this can potentially pose several problems:
a. Lack of specificity: It is difficult to determine the nature and cause of the encountered issue, aside from relying on the error message. This makes it challenging to accurately diagnose, leading to longer troubleshooting times.
b. Difficulty in error identification: Without distinct error types, it becomes difficult to classify and identify different types of errors.
c. Limited error handling capabilities: A generic command exception approach may not adequately support specialised error handling, such as conditional error handling based on error types. Having a wider range of error handling for different types can help with flexibility.
Proposed enhancement(s)
- We will introduce custom exceptions tailored to specific error scenarios, allowing for more precise identification and error handling.
- By doing so, we can potentially add custom error handling depending on the type of error thrown too, making the system more flexible and robust.
9. Seed command for generating sample data
Current implementation
- Currently, there is no seed command implemented. Developers/end-users are required to manually create sample data for testing or initialisation purposes. This approach can be time-consuming and error-prone
Proposed enhancement(s)
- We will introduce a seed command to initialise sample data. By executing the seed command, developers/users can populate the database with mock students, modules, tutorials and teams. This automated approach will not only save time but aslo reduce the likelihood of errors. Clear documentation and usage guidelines will accompany the seed command too.