TAHelper User Guide
Welcome to TAHelper!
Let TAHelper take control of the trivial student management work so that you can focus on what is most important, teaching and delivering quality content to your students!
TAHelper is a desktop app for managing contacts, optimized for use via a Line Interface (CLI) while still having the benefits of a Graphical User Interface (GUI). If you can type fast, TAHelper can get your students' contact management tasks done faster than traditional GUI apps.
- Start your journey with us here today! Learn the basics, and seamlessly integrate into TAHelper today!
- For some uncommon or unfamiliar terms used in this User Guide, click here for the definition and explanation of some.
Why choose TAHelper?
TAHelper offers a whole array of convenience and help:
- Efficient student contact management: A extensive range of commands means that complex student management task can be accomplished in just 1 command.
- Effortless management of student information: all student contact related task can all be done on TAHelper itself, offering a one-stop solution.
- Instant retrieval of information: With just 1 command, any information you want about the students, module, tutorial or tutorial teams can be retrieved.
Table of contents
- TAHelper User Guide
- Why choose TAHelper
- Target Audience
- Purpose of User Guide
- Navigating the User Guide
- Quick Start
- Navigating the GUI
- Features
- Command Format
- Adding new students
- Deleting students
- Searching for students
- Edit student contacts
- Listing all students
- Sort all students
- Adding new tutorial class
- Deleting tutorial class
- Deleting modules
- Listing all tutorial classes
- Adding student to tutorial class
- Deleting students from tutorial class
- Adding new tutorial team
- Deleting tutorial team
- Allocating students to tutorial teams
- Listing all students of a tutorial class
- View a team in tutorial class
- Randomly allocate into teams all students in a tutorial class
- Deleting students from team
- FAQ
- Known issues
- Glossary
- Command summary
Target Audience
- TAHelper is specifically designed to assist and help Teaching Assistants (TA) of NUS Computer Science Modules, which caters to their need to store information in a way that is easy to track and visualise, as well as keep student's details in a centralised storage. This makes it easy for TAs to disseminate information and reference contact information of their students easily. Our target audience is specifically only TAs of NUS Computer Science Modules.
Assumptions about our Target Audience
- Firstly, being TAs of a Computer Science (CS) module in NUS, we can safely assume that they have a decent grasp of basic of CLI and basic software that they have learnt from many of the introductory CS modules they have taken in NUS.
- Secondly, being well-versed with many technical terms and absorbing large amounts of information through all the modules and studying they have been through, we can safely assume that most, if not all of our target users will be able to comprehend and familiarise themselves with not only the User Guide but also our TAHelper system. This essentially allows them to seamlessly integrate themselves with TAHelper and make it user-friendly for them.
- Thirdly, another assumption made is that each module and tutorial class has its own Excel sheet for student management purposes. This cause information to be sparse and make it slightly more difficult to access. We can expect that this application will have a higher utility for TAs who teach more than 1 tutorial class as it provides more convenience for communications between students, and handling of administrative tasks.
Purpose of User Guide
- The purpose of the User Guide (UG) for TAHelper is to provide our target users, TAs of NUS Computer Science modules, with a comprehensive resource that helps user effectively use and understand our application. In the User Guide, we display clear instructions, a quick start guide, and explanations to help users use TAHelper seamlessly and effectively. This help users learn the new system in an extremely short timeframe, while allowing them to understand this application deeply, optimise their workflows and improve their student contact management in the classes they teach.
Navigating the User Guide
Welcome to the TAHelper User Guide! Our goal is to assist and provide you the luxury of information, knowledge and utmost confidence to make full use of TAHelper's features.
- Effortless Navigation: Refer here for the table of contents to aid your navigation.
- Quick start guide for new Users: If you're a new user, visit our Quick Start section to set up and launch the application!
- Features: Want to leverage the capabilities of TAHelper? Visit our Features section to fully utilise the features we offer!
Quick start
Ensuring the correct version of Java installed:
- Ensure you have Java
11or above installed in your Computer. - Visit this website to download Java
11.
- Ensure you have Java
Download TAHelper from here
- Download the latest
tahelper.jar.
- Download the latest
Set up your application environment
- Copy the file
tahelper.jarto the folder you want to use as the home folder for your TAHelper. - Tip: name that folder
TAHelperto facilitate organisation and easy access.
- Copy the file
Using the Terminal to run the application
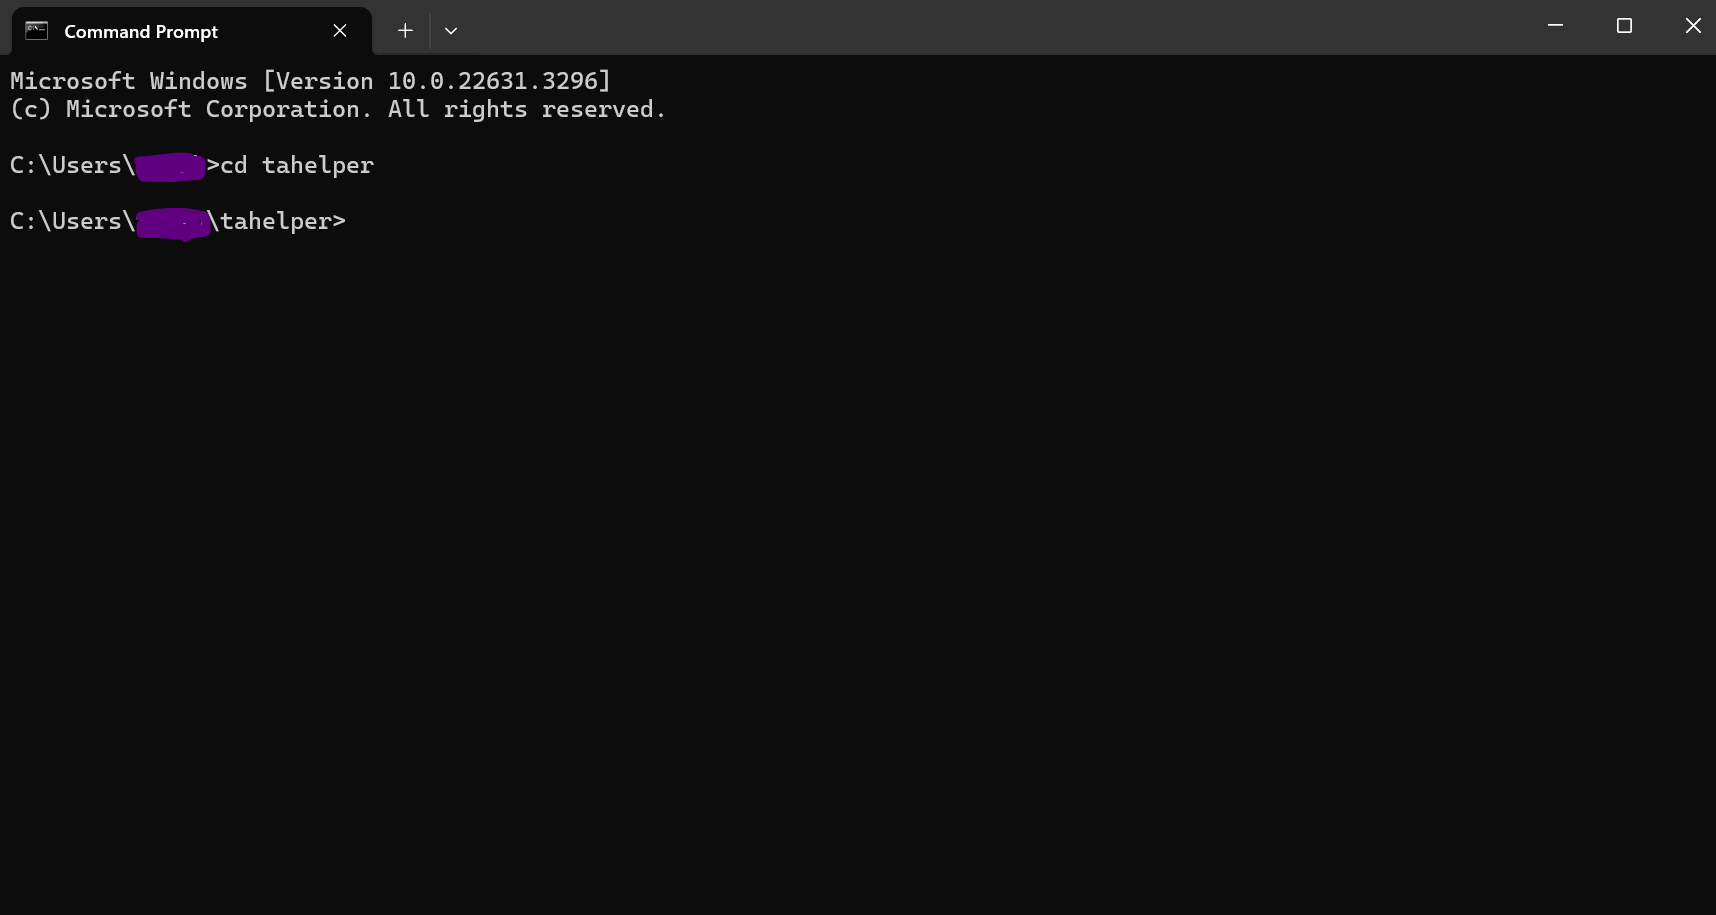
Windows OS:
- Press the windows button and type
cmdinto the search bar. - Then
cdinto the folder you put the jar file in. - It should look something like this:
- Press the windows button and type
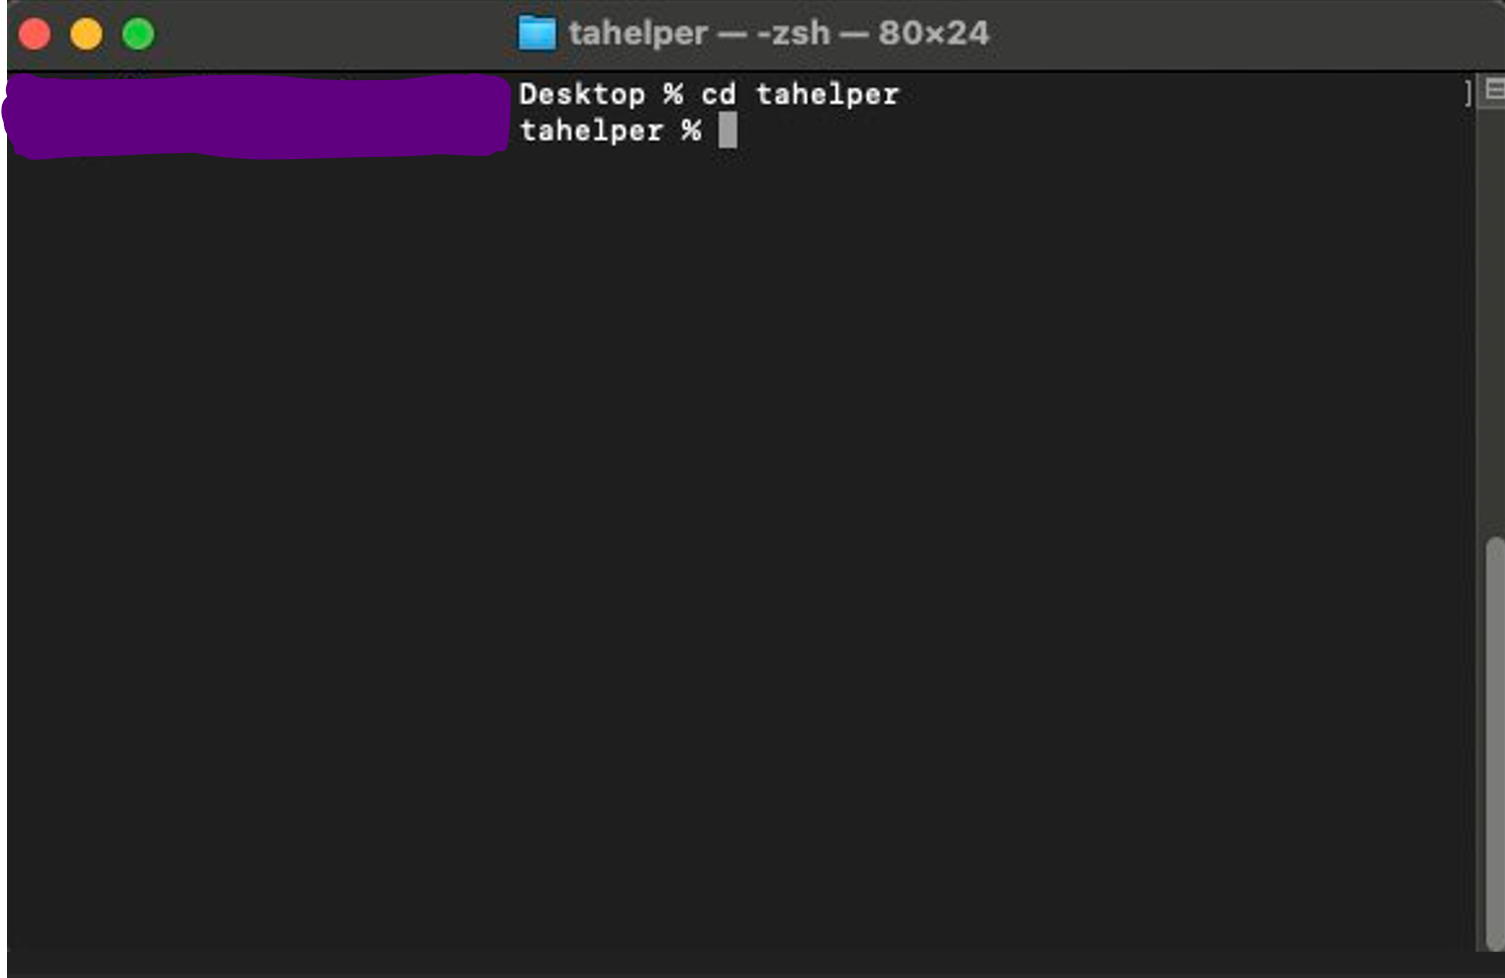
Mac OS:
- Search for Terminal in "Utilities" under "Applications".
- It should look something like this:
Launching TAHelper
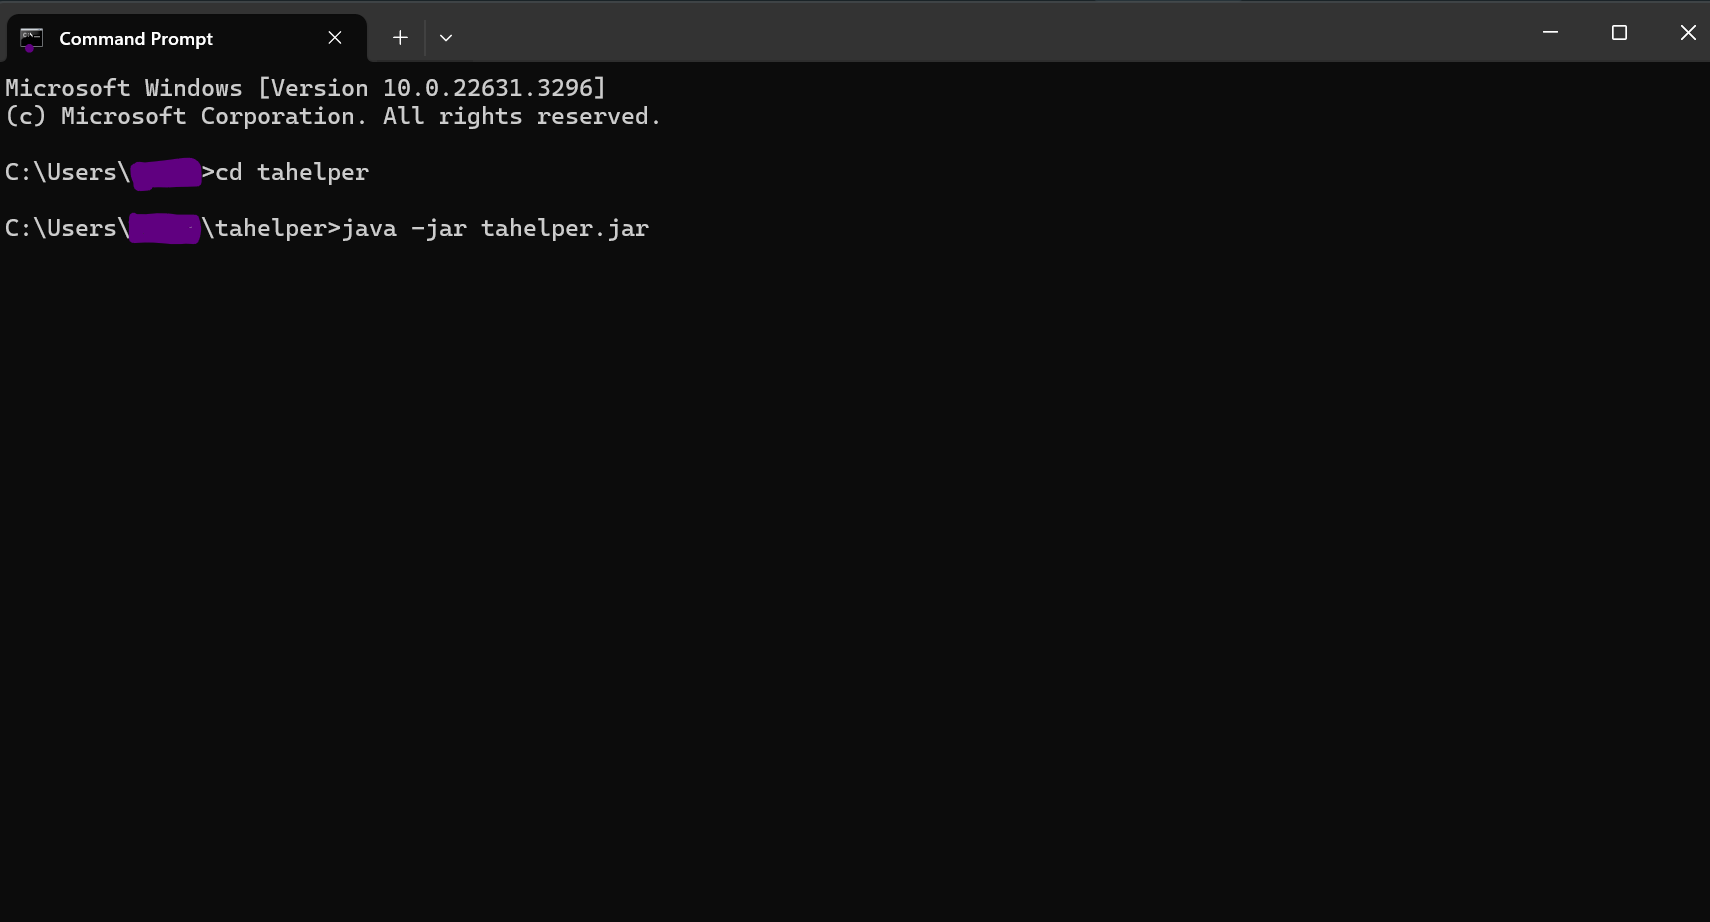
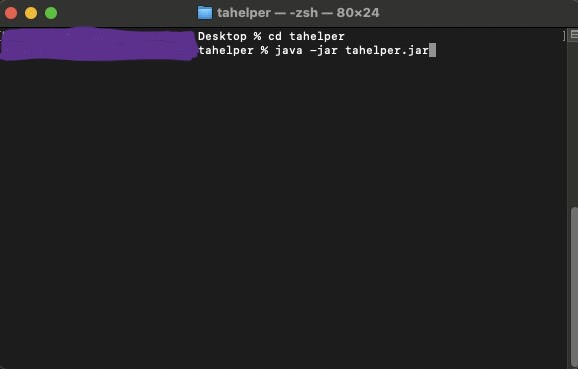
- Type
java -jar tahelper.jarcommand and hit Enter to run TAHelper. - It should look something like this (in this case my jar file is in a folder called
tahelper): - For Windows OS Users:
- For MacOS Users:
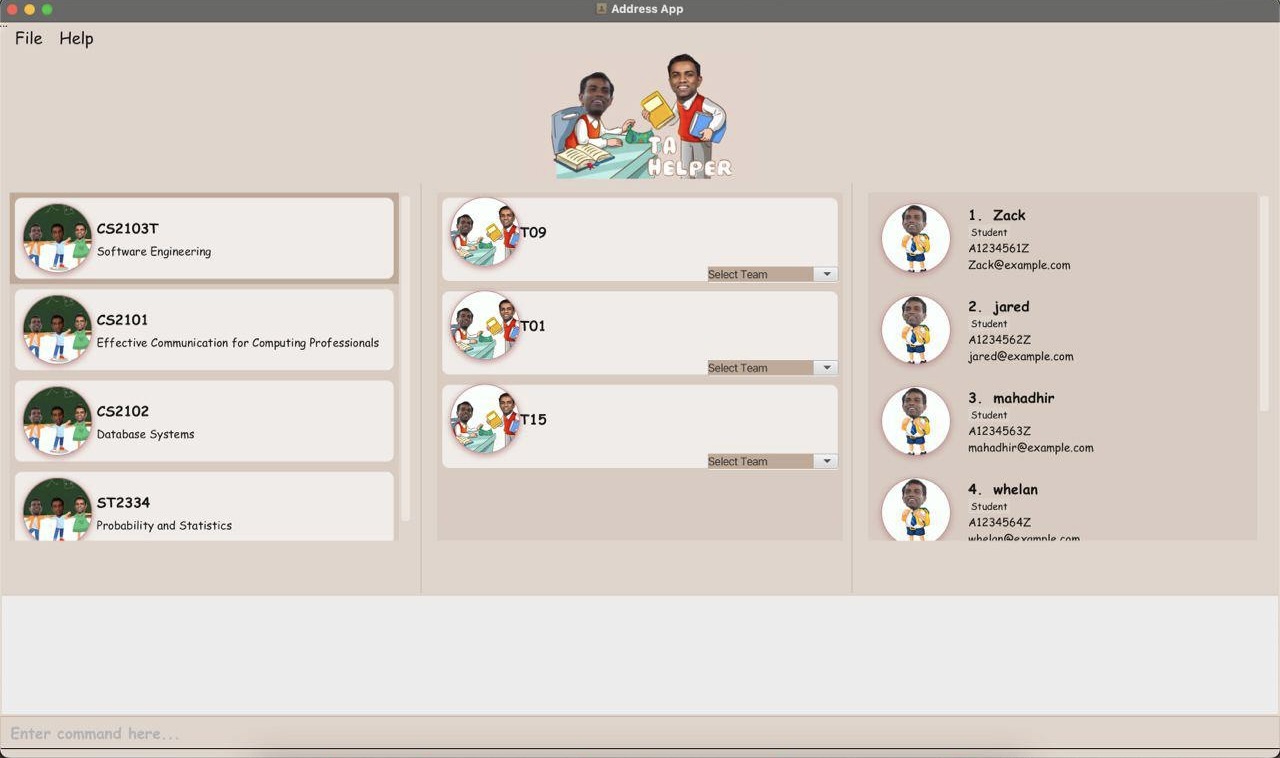
- A GUI similar to the below should appear in a few seconds.
 .
.
- Type
Here are some commands to try out to get a feel of a TAHelper! type them in the Command box
/add_student name/Dohn Joe email/johndoe@gmail.com id/A0123456A: Adds a new student contact with the name, email and ID specified.- A new student entry should appear on the UI with the details reflected clearly.
/delete_student id/A0123456A or /delete_student email/johndoe@gmail.com: Deletes the student that you have add with the previous command.- The student entry with the NUS student ID
A0123456Aor emailjohndoe@gmail.comwill be deleted. - This deletion will be reflected on User Interface of TAHelper as well.
- The student entry with the NUS student ID
For more Commands that will improve your experience, click here
Navigating the GUI
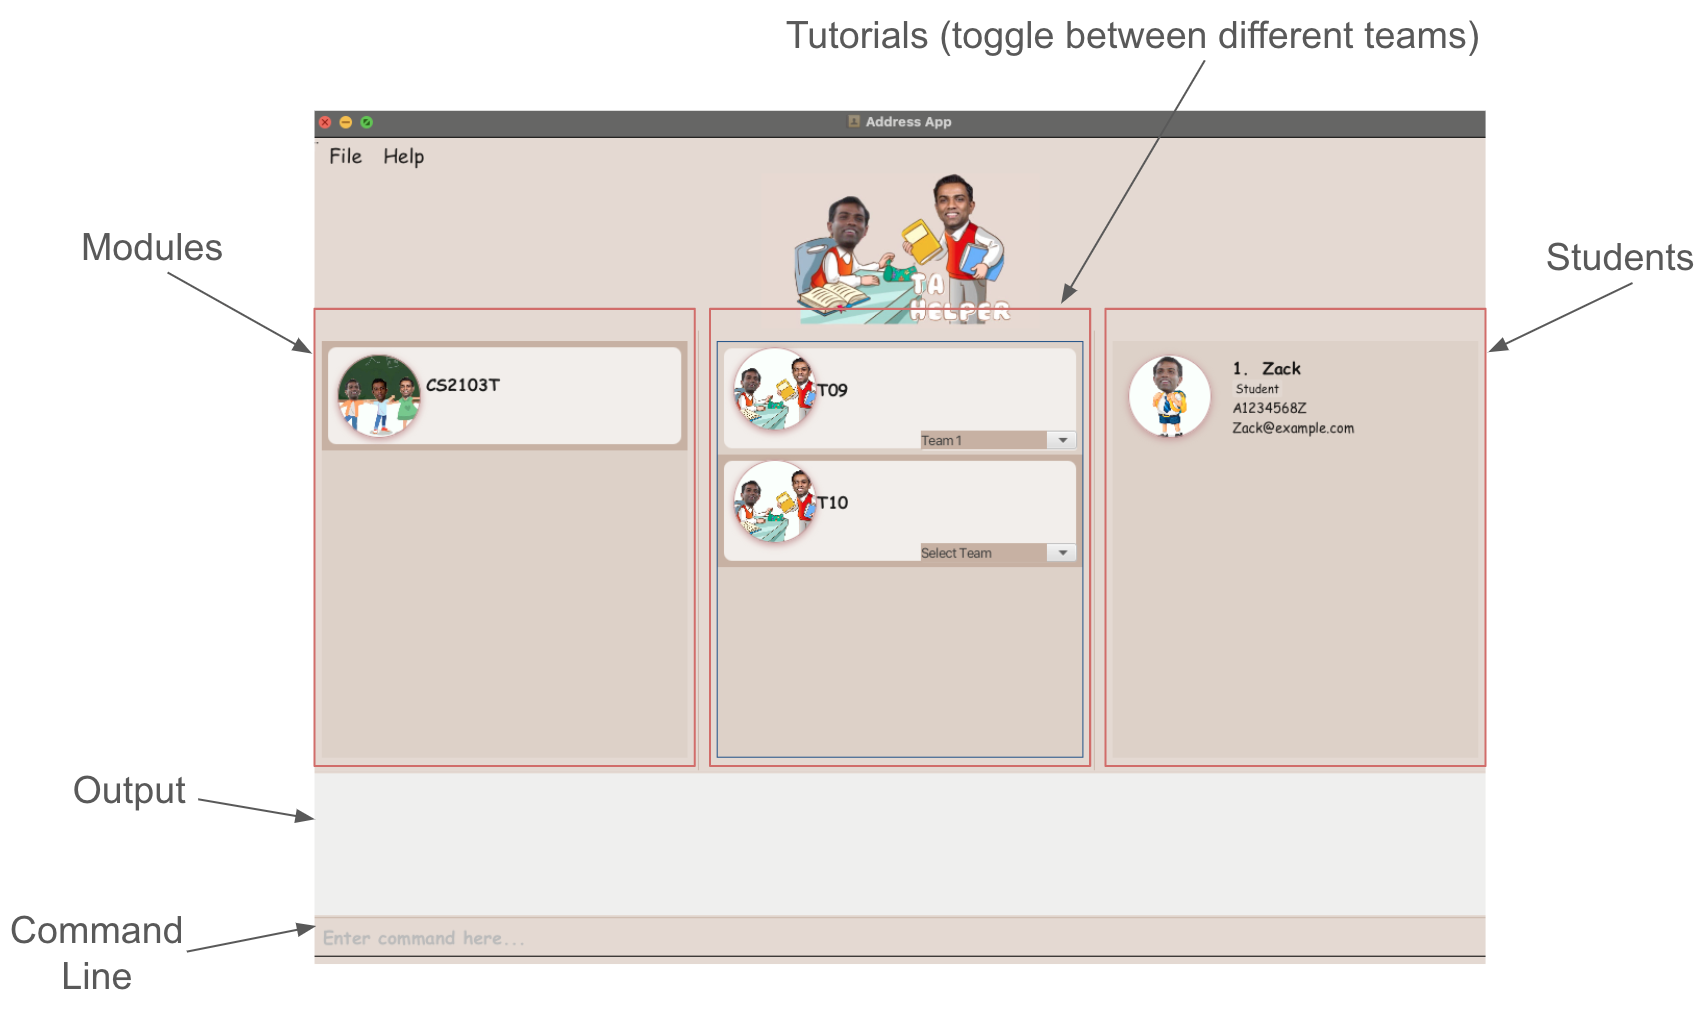
- Users can enter their command in the
Command Line. The output of their commands will be shown in theOutputbox - All modules are listed under the
Modulescolumn - All tutorial classes belonging to the selected module are listed under the
Tutorialscolumn - Within each tutorial class, the team can be selected from the dropdown menu.
- Depending on the user interaction, the list of students in the module, tutorial or team will be shown under the
Studentscolumn. For example, clicking on a module card will display all students in that module. Similarly, clicking on a tutorial class and selecting a team from the dropdown will display all students in that team. - For extra help, users can click on the
Helpbutton at the top left hand corner of the GUI, which will navigate to the user guide.
Commands on students:
/add_student name/Dohn Joe email/johndoe@gmail.com id/A0123456A: Adds a new student contact with all the details./delete_student id/A0259209B or /delete_student email/johndoe@gmail.com: Deletes a student contact with emailjohndoe@gmail.comor idA0259209B./search_student id/A0123456A or /search_student email/johndoe@gmail.com: Searches for a student with idA0123456Aor emailjohndoe@gmail.com./edit_student index/1 name/John: Edits the first student's name toJohn/list_students: View the list of all students available./sort_students by/id or by/name: Sorts the list of students in lexicographical order by id or name./allocate_team id/A1234567Z module/CS2101 tutorial/T01 team/team1: Allocate a student to the specified teamteam1in the tutorial classT01of moduleCS2101./add_student_to_class id/A1234567Z module/CS2101 tutorial/T01: Add the student with the student idA1234567Zto the tutorial classT01of moduleCS2101./delete_student_from_class id/A1234567Z module/CS2101 tutorial/T01: Deletes the student with the student idA1234567Zfrom the tutorial classT01of moduleCS2101./delete_student_from_team id/A1234567Z module/CS2101 tutorial/T01 team/Team 1: Deletes the student with the student idA1234567Zfrom the teamTeam 1in tutorial classT01of moduleCS2101.
Commands on modules:
/add_class module/CS2103T tutorial/T09: Adds a new tutorial classT09under the moduleCS2103T./delete_class module/CS2103T tutorial/T09: Deletes the tutorial classT09under the moduleCS2103T./delete_module module/CS2103T: Deletes the moduleCS2103Tfrom the system./list_classes: List of all tutorial classes available./class_list_students module/CS2103T tutorial/T09: List all the students in the tutorial classT09under the moduleCS2103T./add_team module/CS2103T tutorial/T09 team/Team 1: Adds a new team with team nameTeam 1to tutorial classT09under the moduleCS2103T./delete_team module/CS2103T tutorial/T09 team/Team 1: Removes the team with team nameTeam 1from tutorial classT09under the moduleCS2103T./random_teams module/CS2103T tutorial/T09 teams/2: Randomly allocates all students in the tutorial classT09under the moduleCS2103Tinto2different teams in the tutorial class./view_teams name/Team 1 module/CS2103T tutorial/T09or/view_teams index/1 module/CS2103T tutorial/T09: View the information of the team with team nameTeam 1or index1in tutorial classT09under moduleCS2103T
- Refer to the Features below for details of each command.
Features
Notes about the command format:
Command Format
Here are the main components of the commands:
| Component | Example | Description |
|---|---|---|
| Command Word | /add, /search, /delete | The type of command to be executed by the system. |
| Prefix | name/, email/, id/ | The attributes of the quantity observed. |
| Parameters | NAME, EMAIL, STUDENT_ID | The value of the attribute that the user have to provide after the prefix. |
| Index | 1, 3 | The position of the student in the list it is referencing. Eg. Index 1 of tutorial class T01 refers to the 1st student in the T01 class list. |
Here are symbols used in the commands:
| Symbol | Example | Description |
|---|---|---|
[ ] | [email/EMAIL] | The parameter email is optional and specifying it may not yield additional results |
| NONE | id/STUDENTID | The parameter id needs to be specified. It is compulsory. |
Parameters:
| Field | Prefix | Description/Constraints |
|---|---|---|
| NAME | name/ | Alphanumeric characters |
| email/ | best to follow the format example@mail.com | |
| STUDENT_ID | id/ | Follows the format of NUS Student ID that starts with A. Format must be A, followed 7 numeric digits, and end off with a alphabetical letter. |
| MODULE | module/ | Follows the format of NUS CS modules, which starts with either 2 or 3 alphabetical letters, followed by 4 numeric integer between 0-9, and an optional alphabetical letters. Note: Module codes are case sensitive (must be in all capitals), so CS2103T is valid but cs2103t is not |
| TUTORIAL | tutorial/ | Follows the format of most NUS tutorial class naming, which starts with 1 alphabetical letter and 2 numeric integers from 0-9. Note: Tutorial class names are case sensitive (must be a capital letter), so T09 is valid but t09 is not.As of now, tutorial class names with other formats are not accepted. (such as TO43) |
| TEAM_NAME | team/ | Alphanumeric characters. As of now, the team related error messages may sometimes add Team before the team name, which might lead to confusion. To clarify this, for all purposes, the team name is stored as the exact name you give, and the word Team is not appended to it. (e.g. team/1 is stored as team name 1 and not team name Team 1). The actual name of the team is shown in the UI within the tutorial class it was added under. |
| TAG | tag/ | Tag associated with the student. Alphanumeric characters |
| SIZE | size/ | The size of the team or class. A numeric integer value that is more than 0. |
| DESCRIPTION | description/ | The description of the module. |
| BY | by/ | The parameter you want to search by. Alphanumeric characters |
| INDEX | index/ | The index of the associated student. A numeric integer value that is more than 0. |
Here are symbols used in the commands:
Words in
UPPER_CASEare the parameters to be supplied by the user. e.g. inadd name/NAME,NAMEis a parameter which can be used asadd name/John Doe.Items in square brackets are optional. e.g
/add_class module/MODULE tutorial/TUTORIAL [description/DESC] [size/SIZE]can be used as/add_class module/CS2103T tutorial/T09.Parameters must follow the order specified in the user guide. e.g. if the command specifies `name/NAME id/ID', it has to be in this format.
Extraneous parameters for commands that do not take in parameters (such as
list_student) will be ignored. e.g. if the command specifieslist_student 123, it will be interpreted aslist_student.If you are using a PDF version of this document, be careful when copying and pasting commands that span multiple lines as space characters surrounding line-breaks may be omitted when copied over to the application.
Adding new students : add_student
Adds a new student contact with all the details that have been specified by the user.
Format: /add_student name/NAME email/EMAIL id/STUDENT_ID [tag/TAG]
The following parameters to add a student contact are supported:
- Name
- Student ID
All fields must be specified
Leading/trailing spaces are removed
The parameter is case-insensitive
If none of the parameters or an invalid parameter is specified, the command will return an error message indicating that a valid parameter must be provided.
Expected output: Upon a successful add, the command will return a confirmation messaging stating that the specified student contact has been added.
Example:
/add_student name/Dohn Joe email/johndoe@gmail.com id/A0123456A
Explanation: This adds a student with name Dohn Joe, email johndoe@gmail.com and ID A0123456A into the TAHelper system.
Deleting students : delete_student
Delete a student contact based on the parameter specified by the user.
Format:
- By ID:
/delete_student id/STUDENT_ID - By email:
/delete_student email/EMAIL - By index:
/delete_student index/INDEX
- Only one of the optional parameters (id/email/index) must be provided. If more than one optional parameters are provided, the order of priority for deleting a student is: By index -> By ID -> By Email
- Leading/trailing spaces are removed.
- A complete match must be provided in order for successful operation.
- If the specified student belongs to any tutorial class/teams, the student will be deleted from that particular class/team as well.
- If the specified student is not found, it returns an error.
- If no parameters are specified, it returns an error.
Expected output: Upon successful deletion, the command will return a confirmation messaging stating that the specified student contact has been removed.
Examples:
- Delete by student ID:
/delete_student id/A01234567X - Delete by email:
/delete_student email/e0123456@u.nus.edu - Delete by index:
/delete_student index/1
Searching for students : search_student
Search for a student's contact based on specified query.
Format: /search_student [id/STUDENT_ID] [email/EMAIL] [name/NAME]
- At least one of the optional attributes must be provided.
- The search query is case-insensitive. e.g.
ianwill matchIan - The search query will match information corresponding to the optional attribute. e.g.
id/will only search for IDs - Partial matches will also be displayed e.g.
@gmailwill return ALL emails containing@gmail
Expected output: The command will display the list of all students that match the corresponding prefix. If there are no existing students, the command will return a message indicating that there are no students listed.
Examples:
/search_student id/A012345AReturns student with corresponding id/search_student email/@GMAILReturns all students who have@gmailin their email
Edit student contact: edit_student
Edit a student contact by index number in the displayed student list.
Format: /edit_student index/INDEX [id/STUDENT_ID] [email/EMAIL] [name/NAME]
- Index has to be a positive integer.
- At least one of the optional parameters must be provided.
- Multiple parameters can be provided (not duplicates). Command will edit all parameters specified.
- If the edited student id or email already exists in the list, the command will return an error message.
- Changes made only affect the currently displayed list. In order to sync a student's information across different
modules, tutorial classes or teams, the
/edit_studentcommand has to be executed again on the different student lists in modules, tutorial classes or teams.
Expected output: Upon successful editing, the command will return a confirmation message stating that the student contact has been edited along with the edited student contact.
Examples:
/edit_student index/1 name/Aaronwill edit the student's name at index 1/edit_student index/5 id/A1234567B email/new_email@gmail.comwill edit the student's id and email at index 5
Listing all students : list_students
View the list of all students available
Format: /list_students
Expected output: The command will display the list of all students along with their student information. If there are no matching students, a message will display indicating no students listed.
Sort all students: sort_students
Sorts the list of students by specified parameter
Format: /sort_students by/BY
- Available parameters include:
name,id,email - Only one parameter can be used per command call
- Students' contacts are sorted in lexicographical order.
Expected output: The command will display the list of all students, sorted by the specified parameter, in lexicographical order.
Examples:
/sort_students by/name/sort_students by/email
Adding new tutorial class : add_class
Adds a tutorial class with the specified module code and name.
Format: /add_class module/MODULE tutorial/TUTORIAL [description/DESC] [size/SIZE]
Note:
- An optional class size can be specified to apply a size restriction on the class.
If no class size is specified, it will create an unbounded class (i.e. infinite max size) - Class size must be a positive integer. Any invalid inputs (non-numeric, negative integers) returns an error.
- If none of the parameters is specified, or if only one is specified, returns an error.
- If the module already exists in the system, the system will add the tutorial class specified to the existing module.
Else, the system will create a new module with module code
MODULE_CODEand add the specified tutorial class under it. As such, there is noadd_modulecommand, as this command doubles up to do that too.
Examples:
/add_class module/CS2103T tutorial/T10
Explanation: If moduleCS2103Talready exists in the system, adds a tutorial classT10to the existing module. Else, creates a new moduleCS2103Twith 1 tutorial class under it:T10/add_class module/CS2109S tutorial/T01 description/Introduction to AI size/10
Explanation: If moduleCS2109Salready exists in the system, adds a tutorial classT01to the existing module. Else, creates a new moduleCS2109Swith 1 tutorial class with descriptionIntroduction to AIand class size of10under it:T01
Deleting tutorial class : delete_class
Deletes a specified tutorial class from the list of classes.
Format: /delete_class module/MODULE tutorial/TUTORIAL
Note:
- If the module code does not exist, it returns an error.
- If the tutorial class within that module code does not exist, it returns an error and the list of tutorial classes in that module code.
- If no parameters are specified, returns an error
- The module itself will not be deleted upon deletion of all of its tutorial classes. To delete the module itself, see
delete_module
Examples:
/delete_class module/CS2103T tutorial/T10Explanation: Deletes tutorial classT10from the moduleCS2103T/delete_class module/CS2109S tutorial/T01Explanation: Deletes tutorial classT01from the moduleCS2109S
Deleting modules : delete_module
Deletes a specified module from the system.
Format: /delete_module module/MODULE
- If the module code does not exist, it returns an error.
- If no parameters are specified, returns an error
Examples:
/delete_module module/CS2103T
Explanation: Deletes moduleCS2103Tfrom the system/delete_module module/CS2109S
Explanation: Deletes moduleCS2109Sfrom the system
Listing all tutorial classes: list_classes
Shows a list of all tutorial classes in the address book.
Format: list_classes
Expected output: The command will display the list of all tutorial classes. If there are no existing classes, the command will return a message indicating that there are no classes currently.
Adding student to tutorial class : add_student_to_class
Adds a specified student based on the provided parameter to a specified tutorial class. Format:
- By ID:
/add_student_to_class id/STUDENT_ID module/MODULE tutorial/TUTORIAL - By email:
/add_student_to_class email/EMAIL module/MODULE tutorial/TUTORIAL - By index:
/add_student_to_class index/INDEX module/MODULE tutorial/TUTORIAL
- Only one of the optional parameters (id/email/index) must be provided. If more than one optional parameters are provided, the order of priority for adding a student to a class is: By index -> By ID -> By Email
- If the module code does not exist, it returns an error.
- If the tutorial class within that module code does not exist, it returns an error.
- If the student does not exist, it returns an error.
- If no parameters are specified, it returns an error.
Expected output: Upon successful allocation of student to the tutorial class, the command will return a confirmation messaging stating that the specified student has been added to the class.
Examples:
- Add student by Student ID:
/add_student_to_class id/A01234567X module/CS2103T tutorial/T10 - Add student by email:
/add_student_to_class email/test@gmail.com module/CS2103T tutorial/T10 - Add student by index:
/add_student_to_class index/1 module/CS2103T tutorial/T10
Deleting students from tutorial class: delete_student_from_class
Deletes the specified student from a specified team.
Format:
- By ID:
/delete_student_from_class id/STUDENT_ID module/MODULE tutorial/TUTORIAL - By email:
/delete_student_from_class email/EMAIL module/MODULE tutorial/TUTORIAL - By index:
/delete_student_from_class index/INDEX module/MODULE tutorial/TUTORIAL
- The student detail can be specified with either student id, email or the index of the student within the tutorial class.
Important Note:
- The tutorial class needs to be associated with the module specified.
- The student must be in the class before command execution.
Expected output: Upon successful allocation of student to the tutorial class, the command will return a confirmation messaging stating that the specified student has been deleted from the class.
Example: /delete_student_from_class id/A0123456A module/CS2103T tutorial/T09
Explanation: This deletes the student with student id A0123456A from tutorial class T09 of module CS2103T
Adding new tutorial team : add_team
Adds a new team with the specified team name to the specified tutorial class.
Format: /add_team module/MODULE tutorial/TUTORIAL team/TEAM_NAME [size/TEAM_SIZE]
- An optional team size can be specified to apply a size restriction on the team.
- Team size must be a positive integer. Any invalid inputs (non-numeric, negative integers) returns an error.
- Two teams are equal if they have the same name and belong to the same tutorial (i.e no tutorial should have more than 1 team with the same name), regardless of size.
- If the module code does not exist, it returns an error.
- If the tutorial class within that module code does not exist, it returns an error.
- If the team already exists in that tutorial class, it returns an error.
- If no parameters are specified, it returns an error.
Expected output: Upon successful addition, the command will return a confirmation messaging stating that the new team has been created and allocated to the specified tutorial class.
Examples:
- Without team size:
/add_team module/CS2103T tutorial/T10 team/Team 1 - With team size:
/add_team module/CS2103T tutorial/T10 team/Team 1 size/3
Deleting tutorial team : delete_team
Deletes a specified team from the specified module and tutorial.
Format: /delete_team module/MODULE tutorial/TUTORIAL team/TEAM_NAME
- If the module code does not exist, it returns an error message.
- If the tutorial class within that module code does not exist, it returns an error.
- If the team within that tutorial class does not exist, it returns an error.
Expected output: Upon successful addition, the command will return a confirmation messaging stating that the specified team has been deleted.
Examples:
/delete_team module/CS2103T tutorial/T09 team/Team 1
Explanation: Deletes teamTeam 1from the moduleCS2103Tand tutorialT09
Allocating students to tutorial teams : allocate_team
Allocates a student to an existing tutorial team within a tutorial class.
Formats:
- By ID:
/allocate_team id/ID module/MODULE tutorial/TUTORIAL team/TEAM_NAME - By email:
/allocate_team email/EMAIL module/MODULE tutorial/TUTORIAL team/TEAM_NAME - By index:
/allocate_team index/INDEX module/MODULE tutorial/TUTORIAL team/TEAM_NAME
- All fields from any acceptable formats have to be specified.
- Leading/trailing spaces are removed.
- A student cannot be added to the same tutorial team, under the same module and tutorial class, more than once.
- The index specified is with respect to the index of the student in the tutorial class.
Pre-conditions:
- The student you want to add has to already exist in the TAHelper system.
- The tutorial class has to be associated and exist in the module specified.
- The student you want to add has to already exist in the tutorial class specified.
- The team you want to allocate the student into has to already exist within the specified tutorial class.
Important note:
- Specifying more than one way to allocate student such as
/allocate_team id/ID email/EMAIL module/MODULE tutorial/TUTORIAL team/TEAM_NAMEis not advised.
This is because TAHelper will prioritise looking for the student that matches the ID specified rather than the email specified. This prioritisation is a feature of the system.
Expected output: Upon a successful allocation, the command will return a confirmation message stating that the specified student contact has been allocated to the tutorial team.
Examples:
/allocate_team id/A1234567Z module/CS2101 tutorial/T01 team/team1
Explanation: This allocates a student with ID matching A1234567Z in the tutorial class T01 to a tutorial team team1 of the tutorial class T01 under the module CS2101.
/allocate_team email/johndoe@gmail.com module/CS2101 tutorial/T01 team/team2
Explanation: This allocates a student with email matching johndoe@gmail.com in the tutorial class T01 to a tutorial team team1 of the tutorial class T01 under the module CS2101.
/allocate_team index/1 module/CS2101 tutorial/T01 team/team1
Explanation: This allocates a student with index position 1 in the tutorial class T01 to a tutorial team team1 of the tutorial class T01 under the module CS2101.
Listing all students of a tutorial class : class_list_students
View the list of all students available
Format: /class_list_students module/MODULE tutorial/TUTORIAL
- If the module code does not exist, it returns an error.
- If the tutorial class within that module code does not exist, it returns an error.
Expected output: The command will display the list of all students along with their student information. If there are no existing students, the command will return a message indicating that there are no students in that tutorial class.
Example:
/class_list_students module/CS2103T tutorial/T09/class_list_students module/CS2101 tutorial/T01
View a team in a tutorial class : view_teams
View the information about a team in a tutorial class.
Format:
- By team name:
/view_teams name/TEAM_NAME module/MODULE tutorial/TUTORIAL - By index:
/view_teams index/INDEX module/MODULE tutorial/TUTORIAL
- If the module code does not exist, it returns an error message.
- If the tutorial class within that module code does not exist, it returns an error message.
- If no parameters specified, it returns an error.
- If the team within that tutorial class does not exist, it returns an error.
Expected output: The command will display the team with its information. If there is no such existing team, the command will return a error.
Example:
- View team by team name:
/view_teams name/Team 1 module/CS2103T tutorial/T09 - View team by index:
/view_teams index/1 module/CS2103T tutorial/T09
Randomly allocate into teams all students in a tutorial class : random_teams
Randomly allocates all students in a tutorial class into different teams in the tutorial class.
Format: /random_teams module/MODULE tutorial/TUTORIAL teams/NUMBER_OF_TEAMS
- All fields from any acceptable formats have to be specified.
- Leading/trailing spaces are removed.
Important Note:
- The number of teams cannot be more than the number of students in the tutorial class.
- The tutorial class have to be associated with the module specified.
- The number of teams must be a non-negative integer value.
Expected output: Upon a successful randomisation, the command will return a confirmation message stating that the students in the specified tutorial class has been randomly distributed into different teams in the tutorial class.
Example:
/random_teams module/CS2101 tutorial/T01 teams/2
Explanation: This randomly allocates all the students in the tutorial class T01 of module CS2101 into 2 teams.
Deleting students from team: delete_student_from_team
Deletes the specified student from a specified team.
Format:
- By ID:
/delete_student_from_team id/STUDENT_ID module/MODULE tutorial/TUTORIAL team/TEAM_NAME - By email:
/delete_student_from_team email/EMAIL module/MODULE tutorial/TUTORIAL team/TEAM_NAME - By index:
/delete_student_from_team index/INDEX module/MODULE tutorial/TUTORIAL team/TEAM_NAME
- The student detail can be specified with either student id, email or the index of the student within the tutorial team.
Important Note:
- The team needs to be associated with the tutorial class specified.
- The tutorial class needs to be associated with the module specified.
- As of now, the team related error messages may sometimes add
Teambefore the team name, which might lead to confusion. To clarify this, for all purposes, the team name is stored as the exact name you give, and the wordTeamis not appended to it. As such, if you created the team with team name1, you need to usedelete_student_from_teamwith team name1and notTeam 1.
Expected output: Upon a successful randomisation, the command will return a confirmation message stating that the students in the specified student has been deleted from the team.
Example: /delete_student_from_team id/A0123456A module/CS2103T tutorial/T09 team/4
must be in the team before command execution.
Explanation: This deletes the student with student id A0123456A from team 4 of tutorial class T09 of module CS2103T
Clearing all entries: clear
Clears all entries from the TAHelper application.
Format: clear
Exiting the program: exit
Exit the program.
Format: /exit
FAQ
Q: How can I check the Java version on my computer?
A: Open your command terminal (refer to quick start point 4) if you forgot, and type the following command:
java -version
Q: How do I transfer my data to another Computer?
A: Install the app in the other computer and overwrite the empty data file it creates with the file that contains the data of your previous TAHelper home folder. This file will be found in the data folder which you store the tahelper.jar at.
Q: Will my data be saved when using your app?
A: Your data will always be saved in the data folder where you store the tahelper.jar. However, be sure to only make changes to the data through tahelper itself and do not directly alter the data from the data file.
Known issues
- When using multiple screens, if you move the application to a secondary screen, and later switch to using only the primary screen, the GUI will open off-screen. The remedy is to delete the
preferences.jsonfile created by the application before running the application again.
Glossary
| Term | Definition and/or Explanation |
|---|---|
| OS | Refers to Operating System. Modern Operating System include Windows, Macs and Linux. |
| TA (Teaching Assistant) | An individual who is responsible for teaching a tutorial class of University students. |
| TAHelper | A contact management application to help TAs keep track of students in classes they teach. |
| Graphical User Interface (GUI) | is a type of interface that allows users to interact with electronic devices through graphical icons and visual indicators, as opposed to text-based interfaces, typed command labels, or text navigation. |
| Command Line Interface (CLI) | is a text-based user interface used to interact with software, through the use of key words command such as 'cd'. |
| Lexicographical Order | is the ordering of strings based on the unicode value of each character in the string. |
| CS | Refers to Computer Science. |
| NUS | Refers to National University Of Singapore, which is located at Central Singapore. |
| Command | Refers to an action or input that the user types in tahelper to run a task for the user. |
| Parameter | Refers to a placeholder text that the user has to provide in order for tahelper to recognise the information they want when executing a command. |
Command summary
| Action | Format, Examples |
|---|---|
| Add New Students | /add_student name/NAME email/EMAIL id/STUDENT_ID e.g: /add_student name/Dohn Joe email/johndoe@gmail.com id/A0123456A |
| Delete students | By ID: /delete_student id/STUDENT_IDBy email: /delete_student email/EMAILBy index: /delete_student index/INDEXe.g: /delete_student id/A0259209B |
| Search for students | By ID: /search_student id/STUDENT_IDBy email: /search_student email/EMAILBy name: /search_student name/NAMEe.g: /search_student id/A0123456A |
| Edit student contact | /edit_student index/INDEX [id/STUDENT_ID] [email/EMAIL] [name/NAME]e.g: /edit_student index/1 name/John |
| Sort students | /sort_students by/BYSupported parameters: id, name, email e.g: /sort_students by/id |
| View all students | /list_students |
| Add new tutorial class | /add_class module/MODULE tutorial/TUTORIAL [description/DESC] [size/SIZE] e.g: /add_class module/CS2109S tutorial/T01 description/Introduction to AI size/10 |
| Delete tutorial class | /delete_class module/MODULE tutorial/TUTORIAL e.g: /delete_class module/CS2103T tutorial/T09 |
| View all classes | /list_classes |
| Add New Student to tutorial class | By ID: /add_student_to_class id/STUDENT_ID module/MODULE tutorial/TUTORIALBy Index: /add_student_to_class index/INDEX module/MODULE tutorial/TUTORIALBy email: /add_student_to_class email/EMAIL module/MODULE tutorial/TUTORIAL e.g: /add_student_to_class index/1 module/CS2103T tutorial/T09 |
| Delete students from tutorial class | By ID: /delete_student_from_class id/STUDENT_ID module/MODULE tutorial/TUTORIALBy index: /delete_student_from_class index/INDEX module/MODULE tutorial/TUTORIALBy email: /delete_student_from_class email/EMAIL module/MODULE tutorial/TUTORIALe.g: /delete_student_from_class id/A1234561Z module/CS2103T tutorial/T09 |
| List students of a tutorial class | /class_list_students module/MODULE tutorial/TUTORIAL e.g: /class_list_students module/CS2103T tutorial/T09 |
| Delete module | /delete_module module/MODULE e.g: /delete_module module/CS2103T |
| Add new team | /add_team module/MODULE tutorial/TUTORIAL team/TEAM_NAME [size/TEAM_SIZE] e.g: /add_team module/CS2103T tutorial/T09 team/Team 1 size/5 |
| Delete team | /delete_team module/MODULE tutorial/TUTORIAL team/TEAM_NAME e.g: /delete_team module/CS2103 tutorial/T09 team/Team 4 |
| View team | By name: /view_teams name/TEAM_NAME module/MODULE tutorial/TUTORIAL By index: /view_teams index/INDEX module/MODULE tutorial/TUTORIALe.g: /view_teams name/Team 1 module/CS2103T tutorial/T09 |
| Randomly allocate team | /random_teams module/MODULE tutorial/TUTORIAL teams/NUMBER_OF_TEAMS e.g: /random_teams module/CS2103 tutorial/T09 teams/4 |
| Allocate students to team | /allocate_team id/ID module/MODULE tutorial/TUTORIAL team/TEAM_NAME e.g: /allocate_team id/A1234567K module/CS2103 tutorial/T09 team/Team 4 |
| Delete students from team | By ID: /delete_student_from_team id/STUDENT_ID module/MODULE tutorial/TUTORIAL team/TEAM_NAME By email: /delete_student_from_team email/EMAIL module/MODULE tutorial/TUTORIAL team/TEAM_NAME By index: /delete_student_from_team index/INDEX module/MODULE tutorial/TUTORIAL team/TEAM_NAME e.g: /delete_student_from_team id/A1234567K module/CS2103 tutorial/T09 team/Team 4 |
| Clear entries | clear |
| Exit program | /exit |